The Scene Properties panel controls the camera angle, zoom level, and vertical exaggeration for the entire scene. Open it by clicking the Scene Properties button (second from the left in the toolbar) or pressing Alt+S.
View Orientation
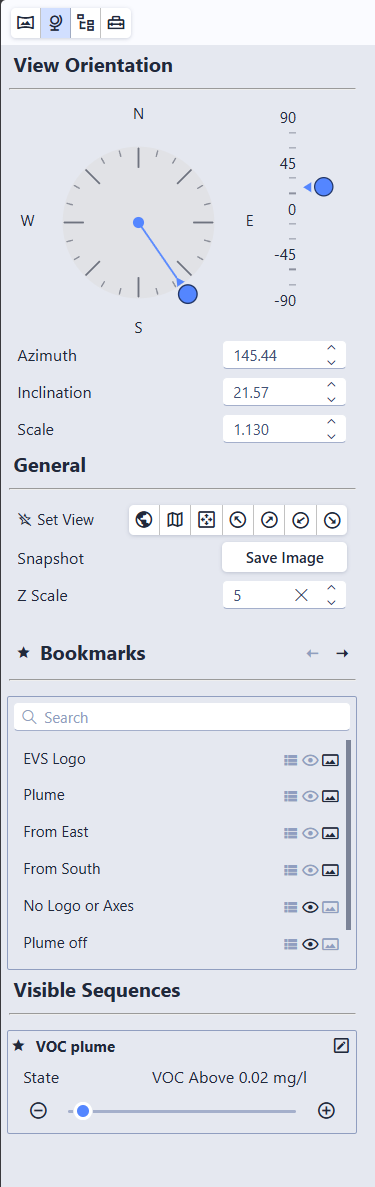
The View Orientation section lets you precisely control the camera angle using interactive controls or numeric inputs.
Compass (Azimuth)
The compass dial controls the horizontal viewing direction. The needle points in the direction the camera is looking.
- Click anywhere on the compass to snap to the nearest 15-degree increment
- Drag the needle to rotate freely in real time
- Cardinal directions (N, E, S, W) are labeled, with major ticks every 45 degrees and minor ticks every 15 degrees
Inclination Slider
The vertical slider to the right of the compass controls the camera’s vertical tilt. Values range from 90 (straight down) to -90 (straight up), with 0 being horizontal.
- Click on the scale to snap to the nearest labeled value
- Drag the thumb to adjust freely in real time
- Major ticks at 90, 45, 0, -45, and -90 degrees
Numeric Inputs
Below the compass and slider, three fields allow precise entry:
| Field | Range | Description |
|---|---|---|
| Azimuth | 0 – 360 | Horizontal viewing direction in degrees |
| Inclination | -90 – 90 | Vertical tilt (90 = top-down, 0 = horizontal) |
| Scale | 0.0001+ | Zoom level of the view |
Each field has spin buttons for fine adjustments.
Set Views
Preset camera positions for quickly jumping to a standard viewing angle:
- Scene’s Original View — The default view saved by the scene author
- Plan View — Top-down, looking straight down
- Fit to Screen — Keep the current angle but zoom to fit the entire model
- View from SE / SW / NE / NW — View from four compass directions at a 20-degree inclination
Click the star icon next to Set Views to add them to the toolbar for quick access.
Tip
You can also use keyboard shortcuts: O for the original view, P for plan view, F to fit to screen. See Keyboard Shortcuts for the full list, including numpad shortcuts for all eight compass directions.
Snapshot
Click Snapshot to save a PNG image of the current view. The file is named {scene name}_snapshot.png.
Title
When multiple scenes are open, a Title field appears showing the name of the active viewport. The title defaults to the scene filename but can be edited to any label you prefer. Titles are displayed in the viewport overlay (when enabled) and are preserved when exporting as .ctmws. See Working with Multiple Scenes for details.
Z Scale (Vertical Exaggeration)
The Z Scale slider adjusts vertical exaggeration for the entire scene. A value of 1.0 means true proportions. Higher values stretch the model vertically, making thin layers or subtle elevation changes easier to see.
The initial Z Scale comes from the setting used when the scene was exported from EVS.
Warning
Objects that normally maintain their shape — such as text labels and spheres used as glyphs — will appear distorted if the Z Scale differs from the value used when the scene was saved.
Bookmarks and Sequences
If the scene file includes bookmarks or visible sequences, their controls also appear in this panel. Favorite them here by clicking the star icon to add them to the toolbar for quick access. See Bookmarks and Sequences for details.