Probe is the default tool. Double-click (or Ctrl+Click) on any object to see detailed information about it at that location. A fuchsia-colored wireframe sphere marks the probed point.
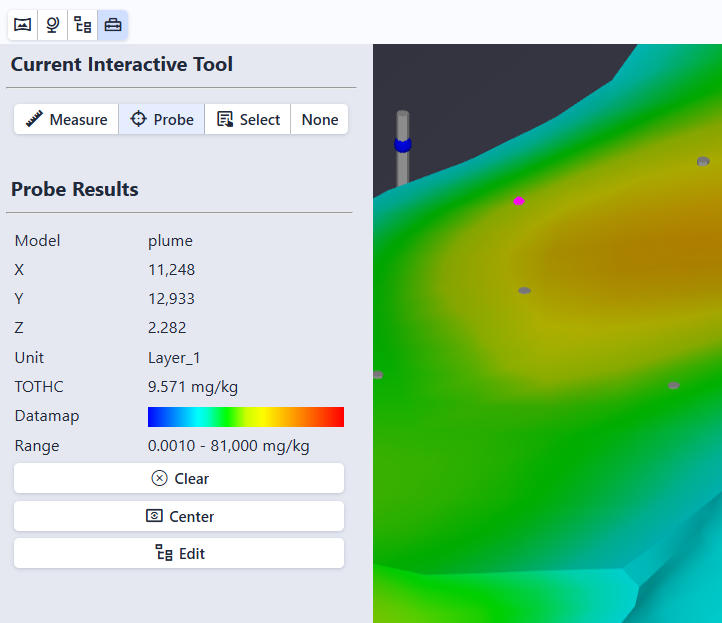
Probe Results
The Probe Results section in the Tools panel shows:
| Field | Description |
|---|---|
| Model | The name of the object that was probed |
| X, Y, Z | The coordinates of the probed point |
| Unit | The geologic unit at the probed location (when available) |
| Analyte value | A row labeled with the analyte name (for example, VOC) showing the interpolated data value at that location. This is an approximation based on the 3D model, not the exact value from the original data. Only shown when the object contains analytical data. |
| Datamap | A visual color bar showing how values map to colors |
| Range | The minimum and maximum values for this dataset |
Info
The fields shown depend on the type of object probed. Objects without analytical data show only the model name, coordinates, and unit (when available).
Action Buttons
Three buttons appear below the probe results:
- Clear: Remove the probe marker and results
- Center: Move the camera to orbit around the probed point. After clicking Center, all mouse rotations pivot around this point instead of the center of the scene.
- Edit: Open the Model Tree with the probed object selected for editing