The C Tech Scene Viewer lets you open and interact with 3D models exported from Earth Volumetric Studio (EVS). Rotate, zoom, and explore scenes in your browser or on the Windows desktop — no EVS license needed.
Try It
The model below is a live Scene Viewer — try rotating, zooming, and clicking objects to get a feel for the controls as you follow along with the help topics.
Step through slices, plume levels, analytes, and other multi-state content.
Subsections of Getting Started
There are two ways to view a scene file: the web viewer and the Windows desktop app. The viewer supports .ctws (single scene) and .ctmws (multi-scene bundle) files.
Web Viewer
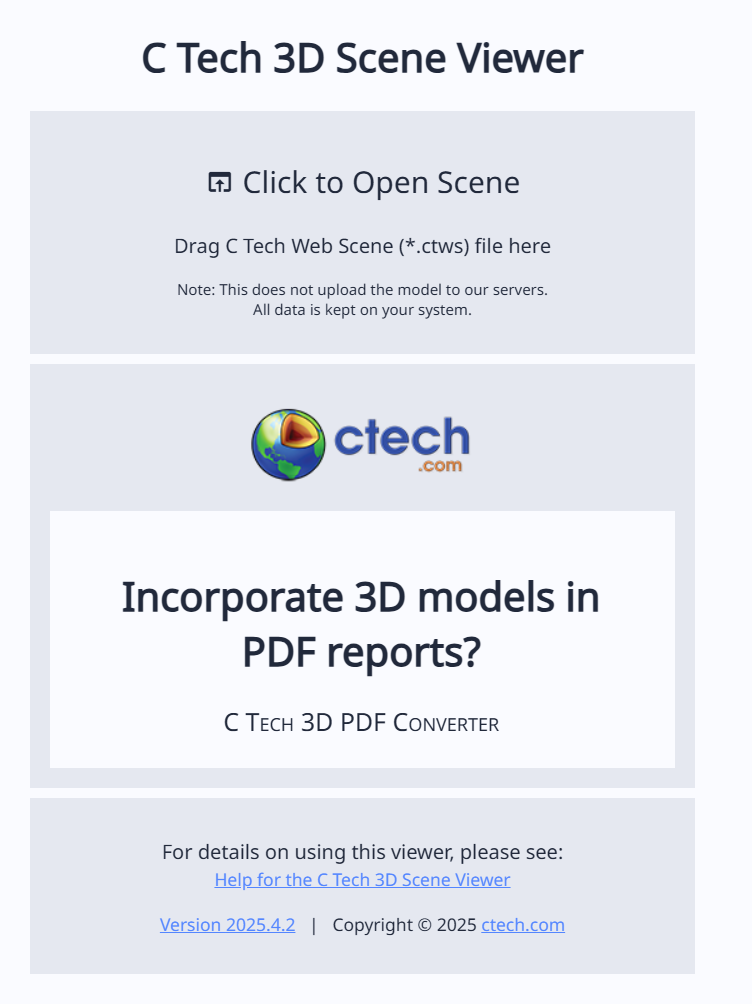
Go to viewer.ctech.com and either drag your scene file onto the page or click Click to Open Scene to browse for it.
Tip
Your organization may have its own branded viewer or may embed C Tech Web Scenes directly into their website. Ask the person who provided your scene file for the best way to view it.
Windows Desktop App
Download and install the desktop viewer from ctech.com/downloads. Double-click any .ctws or .ctmws file to open it. The desktop app works without an internet connection and supports Windows 10 and 11.
Opening Multiple Files
You can open several scene files side by side using the Scene Management button (earth icon) on the right side of the toolbar. You can also drag and drop additional .ctws files onto an already-open viewer. See Working with Multiple Scenes for details.
Once a scene is open, use the mouse or touch gestures to navigate the 3D view.
Mouse Controls
Action
Control
Rotate
Left mouse button + drag
Pan (slide the view)
Right mouse button + drag
Zoom
Scroll wheel, or middle mouse button + drag
Tip
You can also hold Ctrl (or Cmd on Mac) and drag with the left mouse button to pan, as an alternative to the right mouse button. Try it in the live model below.
Touch Controls
On tablets and smartphones, touch gestures replace mouse controls:
Action
Gesture
Rotate
One finger drag
Zoom
Two finger pinch or spread
Pan (slide the view)
Two finger drag
Interacting with Objects
Double-click (or Ctrl+Click) on any object in the scene to interact with it. By default, this probes the object and shows information about it. You can change what double-click does in the Interactive Tools panel.
Tip
Ctrl+Click works the same as double-click for all tools. This is helpful on laptop trackpads where double-clicking precisely can be difficult.
Keyboard Navigation
The viewer supports extensive keyboard shortcuts for changing the view angle, stepping through bookmarks and sequences, and opening panels. Press ? anywhere in the viewer to see the shortcuts dialog, or see the Keyboard Shortcuts reference.
The toolbar is the horizontal bar across the top of the viewer window. It gives you quick access to panel controls, favorited bookmarks and sequences, and viewer-wide actions like scene management and settings.
The toolbar is divided into three areas: panel buttons on the left, favorited controls in the center, and viewer controls on the right.
Full Viewer (landscape icon) — Close the side panel and use the full window for the 3D view
Scene Properties (globe icon) — Open Scene Properties (set views, Z scale, snapshots)
Model Tree (hierarchy icon) — Open the Model Tree (individual object controls)
Interactive Tools (toolbox icon) — Open the Interactive Tools panel (probe, measure, select)
Center: Favorites
Favorites are controls that the scene author decided were critical for interacting with the model. By placing them front and center on the toolbar, the author ensures you can use them without needing to open any side panels.
The types of controls that can be favorited are:
Set Views — Preset camera positions (Scene, Plan, Fit, SE, SW, NE, NW)
Bookmarks — Navigation controls to step through bookmarks
Sequences — Controls to step through sequence states
Tip
The live model below includes bookmarks and sequences — try using the toolbar favorites to step through them.
Info
You can customize the toolbar by favoriting or unfavoriting controls yourself. Look for the star icon next to set views, bookmarks, and sequences in the Scene Properties and Model Tree panels. A filled star means the control is favorited; click it to remove it from the toolbar, or click an empty star to add it.
Right: Viewer Controls
Scene Management (earth icon) — Open the Scene Management menu to add, replace, or close scenes and configure multi-viewport options
Scene Information (i) — Display information about the scene, if provided by the author
Help (?) — Show help and keyboard shortcuts
Language — Change the display language. The viewer defaults to your browser’s language setting, falling back to English. Supported languages: English, Chinese (Simplified), and German.
Overflow menu (three dots) — Contains any favorite controls that don’t fit on the toolbar, plus:
Full Screen — Make the viewer fill the entire screen. Press Escape to exit.
Open New Scene — Browse for a different scene file
Bookmarks are saved states created by the scene author. When favorited, they appear directly in the toolbar — click the arrows or dropdown to step through them without opening any panels.
Each bookmark can control any combination of:
View — Camera position, angle, and zoom level
Object visibility and opacity — Which objects are shown or hidden, and their transparency
Sequence states — The current position of any sequences in the scene
Small icons on each bookmark indicate which properties it controls. Active icons mean the bookmark changes that property; dimmed icons mean it does not.
Tip
The live model below includes several bookmarks — try stepping through them to see how the view and object visibility change.
Info
Not all scene files include bookmarks. If the scene author did not create any, the Bookmarks section will not appear.
Navigating Bookmarks
Click any bookmark to apply it. You can also:
Use the left and right arrows to step through bookmarks in order
Use the dropdown to jump directly to a specific bookmark
Press the Left Arrow and Right Arrow keys on your keyboard
Favoriting Bookmarks
Bookmarks appear in the Scene Properties panel. Click the star icon next to Bookmarks to add them to the toolbar for quick access.
Tip
Favoriting adds a control to the toolbar so you can use it even when the side panel is closed. Many controls in the viewer — bookmarks, sequences, and set views — can be favorited this way.
Sequences are objects that change content in the scene. Each sequence has multiple states — stepping between them updates what you see. When favorited, sequence controls appear directly in the toolbar for quick access.
Common examples include:
Slice positions — Each state moves a slice to a new location
Plume levels — Each state changes the threshold for a contamination plume
Analytes — Each state switches which chemical is displayed
Model revisions — Each state shows a different version of the model
The specific sequences available depend on what the scene author configured.
Tip
The live model below includes sequences — try using the sequence controls to step through different states and see the scene update.
Controlling Sequences
Sequences can appear with three different controls, depending on how the author set them up:
Dropdown — Select a specific state from a drop-down menu
List — Select a state from a visible list of all available states
Slider — Drag to move between states
Use the up/down arrows next to the sequence to step one state at a time.
Info
Some sequences allow cycling — when you step past the last state, it wraps back to the first. This is configured by the scene author.
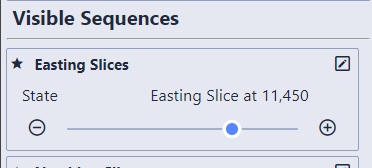
Favoriting Sequences
Sequences appear in the Scene Properties panel under Visible Sequences and can also be found in the Model Tree. The scene author can set any sequence to be a favorite by default, so some sequences may already appear in the toolbar when you open a file. Click the star icon next to a sequence to add or remove it from the toolbar.
When a sequence is favorited, you can control it with the keyboard:
Up/Down Arrow keys — Step the active favorited sequence
Number + Up/Down — Step a specific favorited sequence. For example, hold 1 and press Down to step the first favorited sequence, hold 2 and press Down for the second, and so on (up to 9).
Info
When more than one sequence is favorited and visible, the number keys let you control each one independently. Hold down the number corresponding to the sequence’s position (first favorited = 1, second = 2, etc.) while pressing the arrow keys.
Sequence visibility can also be changed through bookmarks.
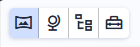
The viewer has three side panels for detailed scene control. Open them from the panel buttons on the left side of the toolbar, or use keyboard shortcuts.
The four buttons are, from left to right: Full Viewer (closes the side panel), Scene Properties, Model Tree, and Interactive Tools. Clicking a panel button opens that panel. Click Full Viewer to close the side panel and return the full window to the 3D view.
Show, hide, and edit individual objects in the scene. Open with Alt+M.
Subsections of Accessing Model Details
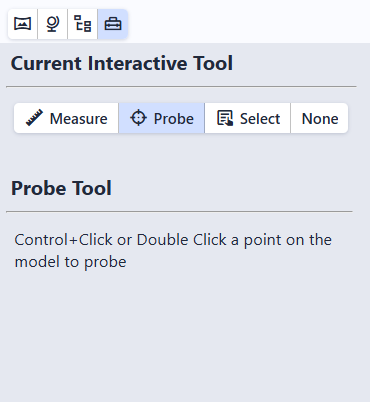
The Tools panel controls what happens when you double-click (or Ctrl+Click) on an object in the scene. Open it by clicking the Tools button in the toolbar or pressing Alt+T.
Select the clicked object in the Model Tree for editing
None
Disable double-click and Ctrl+Click interaction
Tip
Ctrl+Click works the same as double-click for all tools. This is helpful on laptop trackpads where double-clicking precisely can be difficult.
Subsections of Interactive Tools
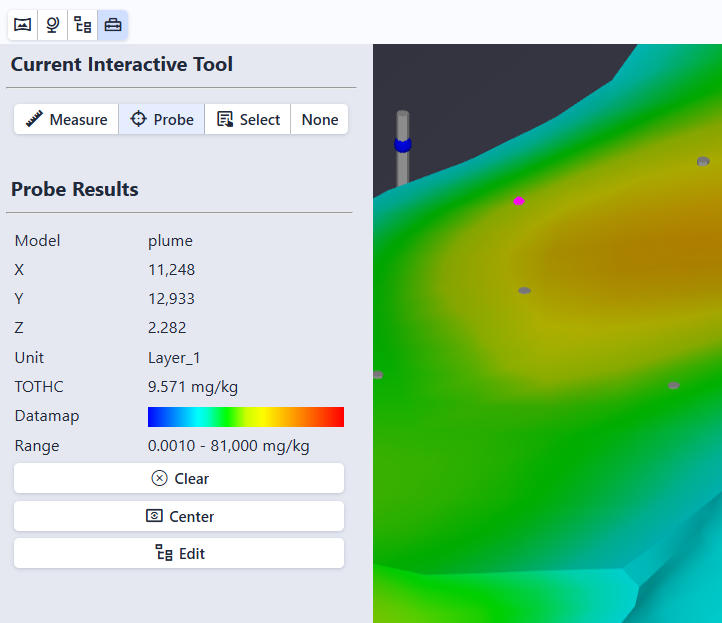
Probe is the default tool. Double-click (or Ctrl+Click) on any object to see detailed information about it at that location. A fuchsia-colored wireframe sphere marks the probed point.
Probe Results
The Probe Results section in the Tools panel shows:
Field
Description
Coordinate
The X, Y, Z location of the probed point
Unit
The name of the object that was probed
Analyte
The chemical or substance being measured (if the object contains analytical data)
Value
The interpolated data value at that location. This is an approximation based on the 3D model, not the exact value from the original data.
Data Range
The minimum and maximum values for this dataset
Datamap
A visual color bar showing how values map to colors
Info
The fields shown depend on the type of object probed. Objects without analytical data show only the coordinate and unit name.
Action Buttons
Three buttons appear below the probe results:
Clear — Remove the probe marker and results
Center — Move the camera to orbit around the probed point. After clicking Center, all mouse rotations pivot around this point instead of the center of the scene.
Edit — Open the Model Tree with the probed object selected for editing
The Measure tool calculates distance, slope, and direction between two points. Double-click (or Ctrl+Click) on the first point, then double-click (or Ctrl+Click) on the second point to see the results.
Measurements
Measurement
Description
3D Distance
Straight-line distance between the two points
2D Distance
Horizontal distance only (ignoring elevation)
Vertical Distance (ΔZ)
Difference in elevation between the two points
Slope
Angle of the line between the points (0° = horizontal, 90° = vertical)
Aspect (degrees)
Compass bearing from point 1 to point 2 (0° = North, 90° = East, 180° = South, 270° = West)
Aspect (direction)
Compass direction as a label (N, NE, E, SE, S, SW, W, NW)
Info
The measure tool accounts for Z scale (vertical exaggeration) correctly. Slope and distance values reflect true-scale geometry, so the reported numbers are accurate even if the visual appearance looks steeper due to vertical exaggeration.
Click Clear to remove the measurement and start a new one.
The Select tool opens the Model Tree and automatically selects the clicked object, making it easy to immediately edit properties such as opacity, wireframe, or visibility.
Double-click (or Ctrl+Click) on any object in the scene to select it. The Model Tree panel opens with that object highlighted and its properties loaded in the Editor.
The Scene Properties panel controls the camera angle, zoom level, and vertical exaggeration for the entire scene. Open it by clicking the Scene Properties button (second from the left in the toolbar) or pressing Alt+S.
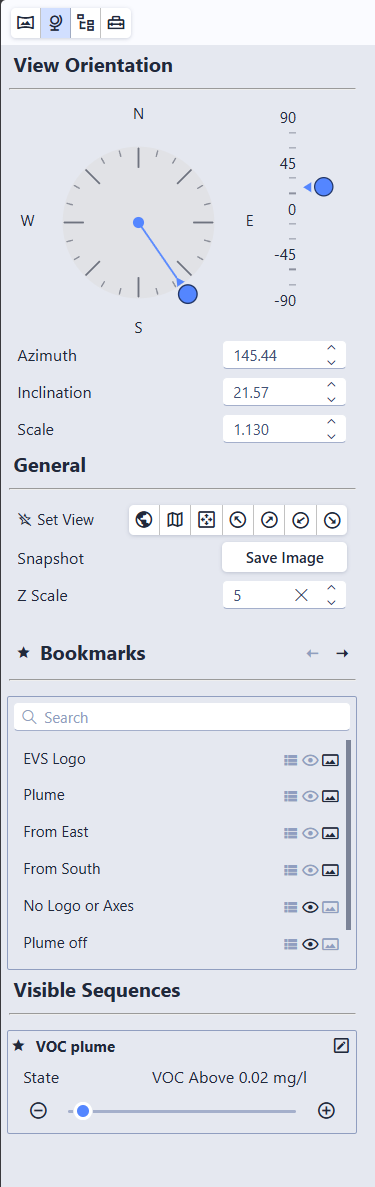
View Orientation
The View Orientation section lets you precisely control the camera angle using interactive controls or numeric inputs.
Compass (Azimuth)
The compass dial controls the horizontal viewing direction. The needle points in the direction the camera is looking.
Click anywhere on the compass to snap to the nearest 15-degree increment
Drag the needle to rotate freely in real time
Cardinal directions (N, E, S, W) are labeled, with major ticks every 45 degrees and minor ticks every 15 degrees
Inclination Slider
The vertical slider to the right of the compass controls the camera’s vertical tilt. Values range from 90 (straight down) to -90 (straight up), with 0 being horizontal.
Click on the scale to snap to the nearest labeled value
Drag the thumb to adjust freely in real time
Major ticks at 90, 45, 0, -45, and -90 degrees
Numeric Inputs
Below the compass and slider, three fields allow precise entry:
Field
Range
Description
Azimuth
0 – 360
Horizontal viewing direction in degrees
Inclination
-90 – 90
Vertical tilt (90 = top-down, 0 = horizontal)
Scale
0.0001+
Zoom level of the view
Each field has spin buttons for fine adjustments.
Set Views
Preset camera positions for quickly jumping to a standard viewing angle:
Scene’s Original View — The default view saved by the scene author
Plan View — Top-down, looking straight down
Fit to Screen — Keep the current angle but zoom to fit the entire model
View from SE / SW / NE / NW — View from four compass directions at a 20-degree inclination
Click the star icon next to Set Views to add them to the toolbar for quick access.
Tip
You can also use keyboard shortcuts: O for the original view, P for plan view, F to fit to screen. See Keyboard Shortcuts for the full list, including numpad shortcuts for all eight compass directions.
Snapshot
Click Snapshot to save a PNG image of the current view. The file is named {scene name}_snapshot.png.
Title
When multiple scenes are open, a Title field appears showing the name of the active viewport. The title defaults to the scene filename but can be edited to any label you prefer. Titles are displayed in the viewport overlay (when enabled) and are preserved when exporting as .ctmws. See Working with Multiple Scenes for details.
Z Scale (Vertical Exaggeration)
The Z Scale slider adjusts vertical exaggeration for the entire scene. A value of 1.0 means true proportions. Higher values stretch the model vertically, making thin layers or subtle elevation changes easier to see.
The initial Z Scale comes from the setting used when the scene was exported from EVS.
Warning
Objects that normally maintain their shape — such as text labels and spheres used as glyphs — will appear distorted if the Z Scale differs from the value used when the scene was saved.
Bookmarks and Sequences
If the scene file includes bookmarks or visible sequences, their controls also appear in this panel. Favorite them here by clicking the star icon to add them to the toolbar for quick access. See Bookmarks and Sequences for details.
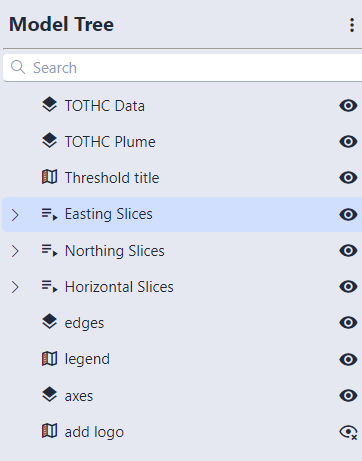
The Model Tree panel shows every object in the scene and lets you control them individually. Open it by clicking the Model Tree button in the toolbar or pressing Alt+M.
The panel has two sections: the Editor at the top and the Model Tree at the bottom.
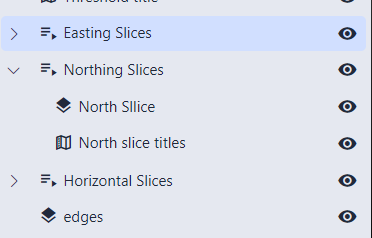
The Model Tree
The lower section lists all objects in the scene, organized in a hierarchy:
Visibility controls — The eye icons on the right show or hide individual objects. Clicking the eye on a group or sequence toggles visibility for everything inside it.
Info
Some objects show a lock icon instead of an eye. Locked objects have their visibility fixed by the scene author and cannot be toggled.
Expanding groups — Groups and sequences can be expanded to reveal their contents. Click any object to select it and edit its properties in the Editor above.
Bulk actions — The three-dot menu at the top right lets you show all, hide all, expand all, or collapse all objects.
Editing Object Properties
Select an object in the tree to open its properties in the Editor panel. The available controls depend on the object type.
Common Controls
Control
Description
Visibility
Show or hide the object
Opacity
Transparency from 0% (invisible) to 100% (solid)
Wireframe
Toggle wireframe rendering
Point / Line Width
Display size of point or line objects
Data Controls
These appear when the selected object contains analytical data (such as contamination values):
Control
Description
Analyte
The chemical or substance being displayed
Datamap
The color scale mapping data values to colors
Data Range
Minimum and maximum values represented by the datamap
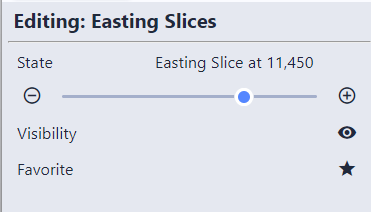
Sequence Controls
When a sequence is selected, the editor shows its current state and lets you step through states or change them directly:
You can also favorite a sequence from here by clicking its star icon to add it to the toolbar.
Object Types
Type
Description
Modules
3D geometry such as surfaces, volumes, boreholes, and other model objects
Groups
Folders that organize related objects together
Sequences
Multi-state objects that change content in the scene (see Sequences)
Annotations
Text labels, legends, and other 2D overlays
The viewer can display more than one scene file at a time, each in its own viewport. This is useful for comparing two versions of the same site model, viewing different sequences or bookmarks from the same file simultaneously, or placing completely different scenes side by side.
The viewer supports two file types:
.ctws — a single scene file
.ctmws — a multi-workspace bundle containing multiple scenes with a predefined layout
The Scene Management button (earth icon) on the right side of the toolbar opens the Scene Management menu, which provides all the controls for adding, replacing, closing, and swapping scenes, configuring how multiple viewports behave, and exporting bundles.
Scene Actions
Action
Description
Add Scene
Open a file picker and add a new scene. The current viewport splits automatically — wider panes split to the right, taller panes split downward. The split button dropdown also provides Add to Right and Add to Bottom for explicit control over split direction.
Close Scene
Close the active viewport. The adjacent viewport expands to fill the space. Only available when multiple scenes are open.
Swap Viewports
Swap the active viewport’s content with another viewport. With exactly two viewports, the swap happens immediately. With three or more, the non-active viewports are highlighted — click one to complete the swap. Press Escape or click the active viewport to cancel. Only available when multiple scenes are open.
You can select multiple CTWS or CTMWS files at once from the file picker.
Tip
You can also drag and drop .ctws files onto the viewer to add them as new viewports.
Working with Multiple Viewports
When more than one scene is open, the viewer splits into resizable panes. Each pane shows its own independent scene with its own model tree, bookmarks, and sequences.
Click on a pane to make it the active viewport — the active pane is highlighted with a colored border
Drag the divider between panes to resize them
The side panel (Interactive Tools, Scene Properties, Model Tree) always shows the controls for the active viewport
Viewport Titles
Each viewport has a Title that defaults to the scene filename. You can edit the title in the Scene Properties > General section when multiple viewports are open. Titles are preserved when exporting as .ctmws.
Saving and Sharing Multi-Viewport Scenes
Once you have arranged multiple scenes the way you want them, you can save everything as a single .ctmws file to share with clients or colleagues. Click Export as .ctmws in the Scene Management menu to create the bundle.
The exported file preserves the complete workspace state, including:
Recipients can then open the single .ctmws file to see the exact same multi-viewport layout without needing to configure anything themselves. Models are optimized to reduce file size when content can be reused across scenes.
Multi-Viewport Options
These options appear in the Scene Management menu when multiple viewports are open. They are organized into sections: Linking, Options, and Export.
Linking
Option
Description
Views
Controls whether viewport cameras stay synchronized. Choose Auto (default — automatically link viewports whose scenes cover similar geographic areas, adjusting for differences in coordinate origin or Z scale), Yes (always link all viewports), or No (each viewport is independent). Auto re-evaluates whenever scenes are added or removed.
Identical Sequences
When enabled (default), changing a sequence state in one viewport automatically updates matching sequences in other viewports. Sequences match when they have the same name and identical state names.
Bookmarks
When enabled (default), applying a bookmark in one viewport automatically applies bookmarks with the same name in other viewports.
Tip
When viewing the same file in two viewports, turn off Identical Sequences to compare two different sequence states side by side, such as viewing two different plume levels of a contamination plume. Keep it enabled when comparing two different models so their sequences stay synchronized.
Options
Option
Description
Overlay Title
Show a title label in the corner of each viewport pane to identify which scene is loaded.
Export
Action
Description
Export as .ctmws
Save the current multi-viewport layout as a .ctmws bundle file. The bundle includes all scenes, the layout arrangement, split ratios, viewport titles, and linking settings. Models are optimized to reduce file size when content can be reused.
Reset
Action
Description
Start New Scene
Open a file picker and replace all existing scenes with the selected file. This closes all current viewports and starts fresh.
Open Settings from the overflow menu (three dots, then Options) or press Alt+O.
Setting
Description
Theme
Choose from four themes: Light Grey, Light Blue, Dark Grey, or Dark Blue
Transition Duration
Controls how quickly the view animates when switching between bookmarks or set views. 100% is the default speed. Lower values make transitions faster; higher values slow them down.
These settings are saved on your device and persist between sessions.
Language
The viewer defaults to your browser’s language setting, falling back to English. To change the language, click the Language button in the toolbar or select a language from this Settings dialog. Supported languages: English, Chinese (Simplified), and German.
Tip
When the language is set to Automatic, a Language button appears in the toolbar. Choosing a specific language hides this button and moves the setting here to the Settings dialog, freeing up toolbar space.
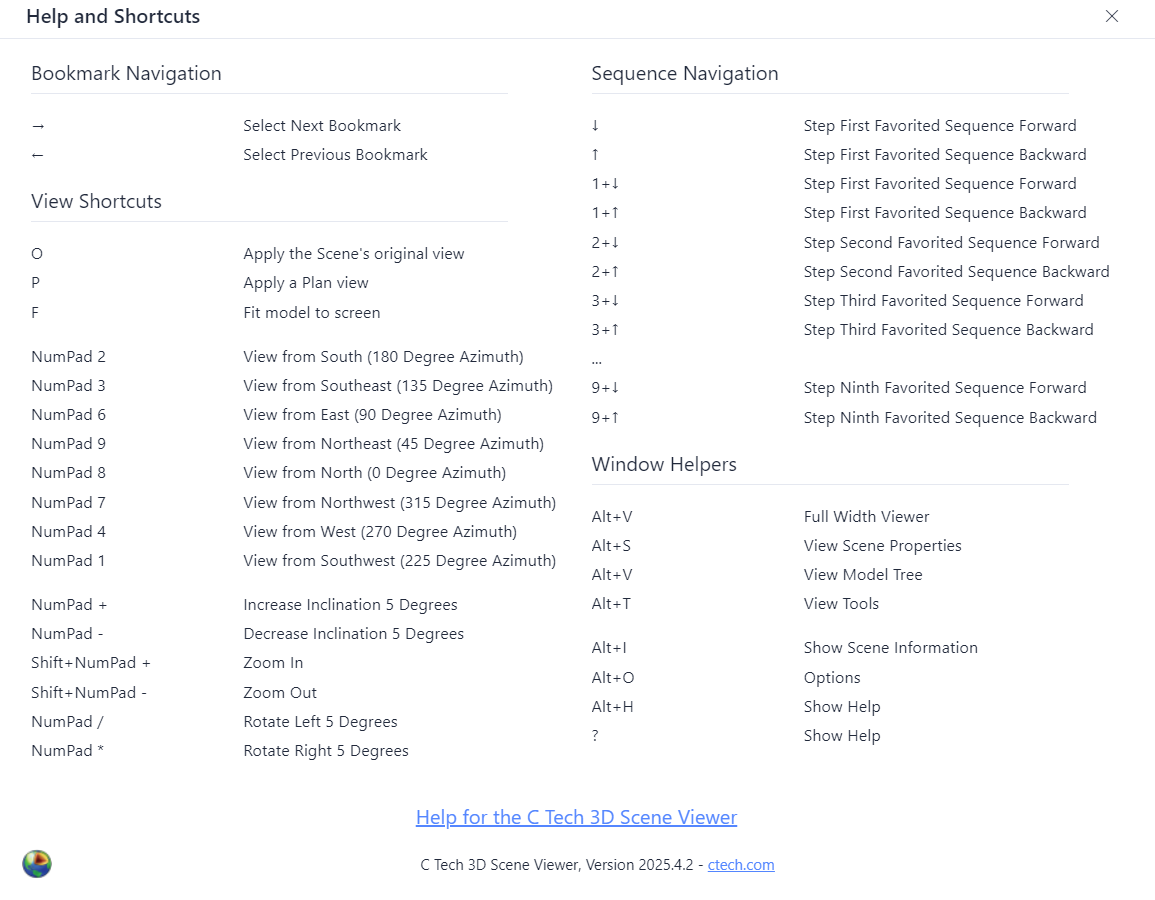
Press ? (or Shift+/) anywhere in the viewer to show the shortcuts dialog.
Info
Numpad shortcuts require a physical numeric keypad. Some shortcuts may not be available on tablets or phones without an external keyboard. Click inside the viewer window to ensure it has focus before using shortcuts.
View Shortcuts
Shortcut
Action
O
Original scene view
P
Plan view (top-down)
F
Fit scene to screen
Numpad Navigation
The numeric keypad maps to compass directions, matching the spatial layout of the keys:
Shortcut
Action
Numpad 7
View from NW
Numpad 8
View from N
Numpad 9
View from NE
Numpad 4
View from W
Numpad 6
View from E
Numpad 1
View from SW
Numpad 2
View from S
Numpad 3
View from SE
Shortcut
Action
Numpad + / −
Increase / decrease inclination (tilt up or down)
Shift + Numpad + / −
Zoom in / out
Numpad / (divide)
Rotate left
Numpad * (multiply)
Rotate right
Bookmark and Sequence Shortcuts
Shortcut
Action
Left Arrow
Previous bookmark
Right Arrow
Next bookmark
Up Arrow
Step active favorited sequence backward
Down Arrow
Step active favorited sequence forward
1–9 + Up/Down
Step a specific favorited sequence (hold the number key, press arrow)
Info
When more than one sequence is favorited and visible, the number keys let you control each one independently. The number corresponds to the sequence’s position in the toolbar (first favorited sequence = 1, second = 2, etc.).
Panel Shortcuts
Shortcut
Action
Alt+V
Full viewer (close all panels)
Alt+S
Scene Properties panel
Alt+M
Model Tree panel
Alt+T
Tools panel
Alt+I
Scene Information
Alt+H
Help
Alt+O
Options / Settings
Browsers
The Scene Viewer works with most modern browsers. We test with and recommend:
Browser
Support Level
Chrome
Primary — used for development and full feature testing
Edge
Fully tested
Safari
Tested, though less extensively
Info
Your browser must be up to date. Outdated browsers may not support all features or may display the scene incorrectly.
Devices
Device
Notes
Windows PCs
Most thoroughly tested. Full functionality including all keyboard shortcuts.
Mac computers
Works well, especially with Chrome.
Tablets (iPad, Android)
Good performance on recent models. Touch gestures replace mouse controls. Keyboard shortcuts require an external keyboard.
Smartphones
Recent phones provide excellent performance. Touch gestures replace mouse controls. Keyboard shortcuts require an external keyboard.
A standalone Windows application is available at ctech.com/downloads. It allows opening scene files without an internet connection and supports Windows 10 and Windows 11.
If your issue is not listed here, contact C Tech support at support@ctech.com.
Blank or black screen after opening a file
The viewer requires WebGL, which is supported by all modern browsers. If you see a blank or black screen:
Make sure your browser is up to date
Check that hardware acceleration is enabled in your browser settings (search for “hardware acceleration” in your browser’s settings page)
Try a different browser — Chrome is recommended
Scene loads slowly or rotation is choppy
Large or complex scenes may need more graphics processing power.
Close other browser tabs to free up memory
Try a different browser (Chrome typically offers the best performance)
On a laptop, make sure it is plugged in — battery saver modes can reduce graphics performance
Reduce the browser window size — a smaller viewport requires less rendering work
Keyboard shortcuts are not working
Click inside the viewer window first to make sure it has keyboard focus
Numpad shortcuts (rotation, zoom, inclination) require a physical numeric keypad — they will not work on compact keyboards or laptops without a numpad
On some laptops, make sure Num Lock is enabled
Scene file will not open or shows an error
Verify the file has a .ctws or .ctmws extension and was exported from EVS
If the file was downloaded, make sure the download completed fully — partial downloads will not open
Try opening the file at viewer.ctech.com to rule out issues with the desktop app
Z Scale looks wrong
The Z Scale (vertical exaggeration) is inherited from the EVS settings when the scene was saved. If objects appear too stretched or squished vertically:
This section covers how to publish and distribute viewer models for your organization. Whether you need to apply custom branding to your viewer pages or embed models into your own websites and platforms, you’ll find the guidance you need here.
Package multiple scenes into a single .ctmws file for sharing or embedding.
Subsections of Publishing
Custom Branding
Enterprise customers can have a custom branded landing page for the C Tech 3D Scene Viewer. A branded page removes default advertising and provides a customized experience for your clients and stakeholders.
You can see a live example of a branded landing page at the EnviroFaux sample site, which demonstrates the branding features described below using a fictitious company.
Branded Landing Page
Your branded landing page lives on the C Tech viewer domain with your organization’s name — for example, viewer.ctech.com/envirofaux.html. This page displays your custom logo and branding instead of the default C Tech branding.
Embedding in Your Own Domain
You can embed your branded page within your own website using an IFRAME, so that users access the viewer through your domain rather than the C Tech domain. This gives you full control over the URL your clients see.
For example, the EnviroFaux sample site embeds the viewer at envirofaux.com/viewer — the same branded viewer, but accessed through the client’s own domain.
Client-Specific Customization
Info
This feature requires the Unlimited Client Customized Landing Pages option. See the C Tech price list for details.
With this option, you can dynamically customize the landing page on a per-client or per-project basis by adding URL-encoded search parameters for the page title and logo. This lets you create unique viewer links for different clients or projects without needing a separate branded page for each one.
The two parameters you can set are:
Parameter
Description
title
The page title displayed in the viewer header
logo
A URL pointing to the logo image to display
Both values must be URL-encoded. You then append them as query parameters to your branded page URL.
For example, starting from the EnviroFaux branded page, you could create a customized link for a client called “ACME Site”:
You can embed interactive 3D Scene Viewer models directly into your own website, dashboard, or intranet page using an IFRAME. The example embedded model below demonstrates the interactive experience your users will have.
Configure your domain to host scene files for the embedded viewer.
Combining with Custom Branding
Embedded viewers work well alongside Custom Branding. You can embed a branded viewer page in your own domain using an IFRAME, giving your users a seamless experience under your own URL. See the Custom Branding page for details on branded landing pages and client-specific customization.
Subsections of Embedding & Hosting
Embed Code Generator
C Tech provides an Embed Code Generator that builds the HTML snippet for you — fill in your hosting details and copy the result into your page.
How It Works
The embedded viewer loads a lightweight, read-only version of the Scene Viewer inside an IFRAME on your page. Users can rotate, zoom, pan, and interact with the model just like the full viewer, but cannot upload or modify files.
The generated embed code points to viewer.ctech.com/inline_viewer.html with query parameters that identify your scene file and authenticate the request.
Required Information
Before generating an embed code, you need the following:
Field
Description
Scene Filename
The name of your scene file (e.g., myScene.ctws or myBundle.ctmws). Case-sensitive.
Domain Hosting Scene File
The full URL of the server hosting your scene files (e.g., https://viewerdemo.ctech.com).
Folder Containing Scene File
The subdirectory path on the hosting domain where your files are stored (e.g., clients/myclient). Leave empty if the file is at the domain root. Case-sensitive.
API Key
A 16-character hexadecimal key that authenticates requests to your hosting domain. This is provided by C Tech when your hosting domain is configured.
Viewer Options
The embed generator also lets you configure how the embedded viewer appears:
Option
Default
Description
Width
80%
Width of the embedded viewer. Accepts pixels (e.g., 640) or a percentage (e.g., 80%).
Height
400px
Height of the embedded viewer. Accepts pixels (e.g., 600) or a percentage.
Allow Full Screen
On
When enabled, users can expand the viewer to fill their screen.
Allow Scene Information
On
When enabled, the information panel is available for users to inspect model details.
Generated Embed Code
After filling in the required fields, the generator produces an HTML snippet you can copy and paste into your website. A typical embed code looks like this:
The model parameter is a URL-encoded path built from your domain, folder, and filename. The generator handles the encoding automatically.
Tip
The Embed Code Generator remembers your settings between visits, so you only need to enter your domain and API key once.
Tip
To embed multiple scenes side by side, use a .ctmws bundle file. See Multi-Scene Embedding for details.
URL Parameters Reference
If you prefer to construct embed URLs manually, the inline viewer accepts these query parameters:
Parameter
Required
Description
apikey
Yes
Your 16-character API key
model
Yes
URL-encoded path to the scene file (domain + folder + filename). Supports both .ctws and .ctmws files.
include_info
No
Show or hide the information panel (true or false, defaults to true)
Multi-Scene Embedding
You can embed multiple scenes in a single viewer by using a .ctmws (multi-workspace) bundle file instead of a single .ctws file. The .ctmws format packages multiple scenes together with their layout, titles, and linking settings into one file.
The example below shows three TCE contamination plume models from different time periods displayed in a single embedded viewer:
To embed a multi-scene layout, use the .ctmws file in the Embed Code Generator the same way you would a single .ctws file.
Creating a .ctmws Bundle
Open the Scene Viewer and load your scenes using the Scene Management menu
Arrange the layout, set titles, and configure linking options
Click Export as .ctmws in the Scene Management menu
Host the exported .ctmws file on your domain alongside your other scene files
The exported bundle preserves the complete workspace state — layout arrangement, split ratios, viewport titles, and linking settings. See Saving and Sharing Multi-Viewport Scenes for details.
Hosting Requirements
To host scene files on your own domain, C Tech must configure your domain in the viewer’s hosting system. Each domain is registered with a unique API key. Contact C Tech to set up hosting for your domain.
Your hosting server must meet these requirements:
HTTPS — Scene files must be served over HTTPS.
CORS policy — The server must include a Access-Control-Allow-Origin header that permits GET requests from viewer.ctech.com. Without the correct CORS configuration, the browser will block the viewer from loading your scene files. Most cloud storage providers (e.g., Azure Blob Storage, AWS S3) have CORS settings in their configuration panels.
Case-sensitive paths — Folder paths and filenames are case-sensitive on most hosting servers.


