Python scripting in Earth Volumetric Studio provides a method to programmatically control and automate virtually every aspect of the application. By leveraging the Python programming language, you can move beyond manual interaction to create dynamic, data-driven workflows, automate repetitive tasks, and perform custom analyses that are not possible with standard interface controls alone.
This topic provides a high-level overview of what Python scripting is, why it is useful, and what it can achieve.
Accessing Python Scripting Features
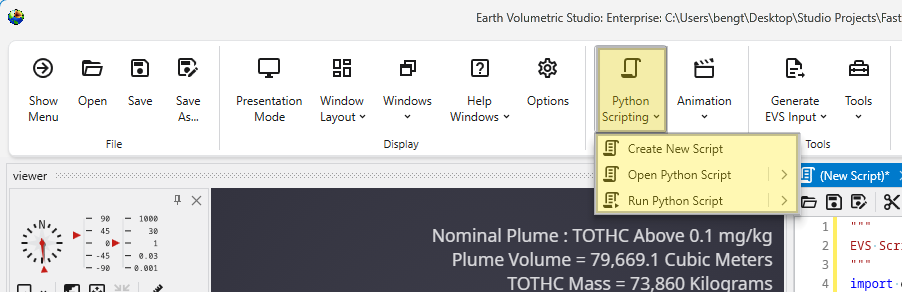
The main entry point for all scripting functionality is the Python Scripting button in the main toolbar.
This dropdown menu provides options to create, open, and run scripts, which are managed in the dedicated Python Window.
Why Use Python Scripting?
While the graphical interface is ideal for building and exploring applications, scripting excels at tasks that require logic, repetition, and automation. It allows you to codify your workflow, making it precise, repeatable, and easy to share.
The primary benefits of scripting include:
Automation: Automate repetitive tasks, such as generating reports or exporting images for a series of different datasets or parameters.
Custom Logic: Implement complex conditional logic and loops that are not possible with other features.
Data Integration: Read data from external sources (like CSV files, databases, or web APIs) and use it to dynamically control your EVS application.
Advanced Analysis: Use popular Python libraries like NumPy and Pandas to perform sophisticated data analysis and feed the results back into EVS modules.
Python Scripting vs. Sequences
Both Python scripts and Sequences can be used to create dynamic applications, but they serve different purposes.
Feature
Sequences
Python Scripting
Nature
A finite collection of predefined, static states.
A program that can execute logic, loops, and calculations dynamically.
Use Case
Ideal for presentations and guided exploration through a set series of steps (e.g., a slider for plume levels).
Ideal for automation, custom analysis, and workflows that require conditional logic or external data.
Flexibility
Limited to the states that were explicitly saved by the creator.
Nearly limitless. Can respond to data, create or destroy modules, and change application structure on the fly.
In short, use sequences when you want to present a curated set of options to a user. Use Python scripting when you need to automate a process or perform actions that are data-dependent and cannot be predefined.
Common Use Cases and Examples
Python scripting opens up a vast range of possibilities. Here are a few common examples of what you can achieve.
Batch Processing and Report Generation
Imagine you have 50 different data files that all require the same analysis. A Python script can automate this entire workflow:
Loop through a directory of input files.
For each file, update the file path in a module.
Execute the application.
Export a screenshot of the final viewer with a unique name.
Read a result from the volumetrics module and write it to a summary CSV file.
Parametric Studies
A script can be used to investigate how changing a key model parameter affects the results. For example, you could write a script to:
Loop through a range of values for the 3d estimation module’s Reach parameter (e.g., from 500 to 5000 in steps of 100).
For each value, execute the application and log the resulting plume volume.
This allows you to systematically assess the sensitivity of your model to that parameter.
Dynamic Application Control
Scripts can modify the application in response to data. For example, a script could:
Read a text file containing a list of coordinates.
For each coordinate, move the slice module to that location.
If a certain condition is met (e.g., the average concentration on the slice exceeds a threshold), the script could automatically log these locations to the Output Log.
The Python Script Editor is the integrated environment within Earth Volumetric Studio for writing, editing, and running Python scripts. It provides a full-featured text editor with syntax highlighting, code formatting tools, and direct access to execution and debugging functions, making it the central hub for all your scripting activities.
Accessing the Python Script Editor You can open the editor through the Python Scripting button located in the Main Toolbar.
You can programmatically read and set the properties of any module using Python Scripting. This is a powerful feature for automating workflows and creating complex interactions between modules. The scripting engine provides programmatic access to the same underlying properties that are exposed as controls in the Properties window. This allows scripts to read, evaluate, and update values, mirroring manual user interaction. The easiest way to script a property is to copy the required syntax directly from the Properties window.
Reference for the EVS Python API functions available in the evs and evs_util modules.
Subsections of Python Scripting
The Python Script Editor is the integrated environment within Earth Volumetric Studio for writing, editing, and running Python scripts. It provides a full-featured text editor with syntax highlighting, code formatting tools, and direct access to execution and debugging functions, making it the central hub for all your scripting activities.
Accessing the Python Script Editor
You can open the editor through the Python Scripting button located in the Main Toolbar.
The dropdown menu provides three main options:
Option
Description
Create New Script
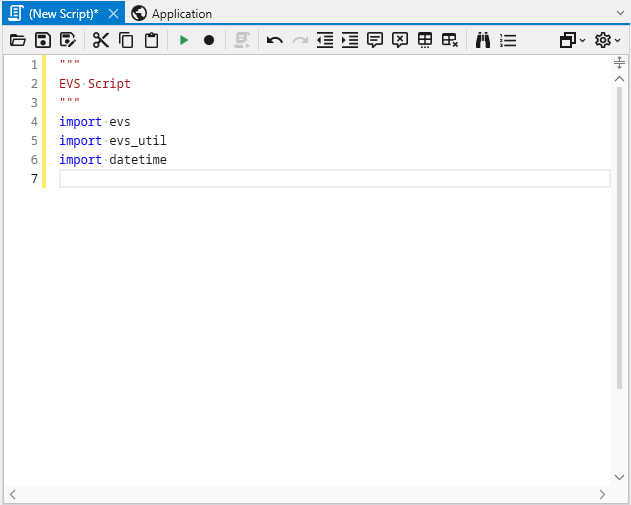
Opens the Python Script Editor with a new, blank script. The new script is prepopulated with default import statements for the essential EVS libraries (evs, evs_util) to get you started quickly.
Open Python Script
Allows you to browse for and open an existing Python (.py) file from your computer. Clicking the button opens up a file dialog while hovering over the right arrow opens a list of recently used Python script files.
Run Python Script
Executes a Python script. Hovering over this option will also show a list of recent scripts for quick execution.
Once a script is created or opened, the Python Script Editor window will appear.
Editor Toolbar Reference
The toolbar at the top of the editor provides a wide range of tools for managing and editing your code.
File and Edit Operations
Button
Function
Description
Open Script
Open a python file
Opens a file browser to load an existing script.
Save Script
Save the current python file
Saves the currently active script.
Save Script As
Save the current python file with a new filename
Saves the script to a new file.
Cut (Ctrl+X)
Cut the selection and put it on the Clipboard.
Removes the selected text and copies it to the clipboard.
Copy (Ctrl+C)
Copy the selection and put it on the Clipboard.
Copies the selected text to the clipboard.
Paste (Ctrl+V)
Paste the Clipboard contents into the document.
Inserts text from the clipboard at the cursor location.
Undo (Ctrl+Z)
Undo the last edit.
Reverts the last change made to the script.
Redo (Ctrl+Y)
Redo the last edit.
Re-applies the last change that was undone.
Execution and Recording
Button
Function
Description
Run (F5)
Execute the Current Script.
Runs the script.
Record (F12)
Record all Property interactions.
Toggles recording mode. When active, your interactions with module properties in the UI are automatically translated into Python code and appended to the script.
Run in Interactive (Alt+Enter)
Execute the Selected Code in Python Interactive.
Runs only the selected lines of code in the Python Interactive window, which is useful for testing small snippets.
Code Formatting and Navigation
Button
Function
Description
Decrease Indentation
Decrease indentation amount.
Shifts the selected lines of code to the left.
Increase Indentation
Increase indentation amount.
Shifts the selected lines of code to the right.
Comment Lines
Comment out the selected lines.
Adds a ‘#’ character to the beginning of each selected line, disabling them as code.
Uncomment Lines
Uncomment out the selected lines.
Removes the ‘#’ character from the beginning of each selected line.
Untabify Selected Lines
Convert tabs to spaces in selected lines.
Replaces tab characters with the equivalent number of spaces.
Trim Trailing Whitespace
Remove all trailing whitespace.
Deletes any spaces or tabs at the end of each line in the script.
Find or Replace (Ctrl+F)
Find or Replace in the current script.
Opens a dialog to search for text and optionally replace it.
Goto Line (Ctrl+G)
Goto a specific line by number.
Jumps the cursor directly to the specified line number.
Additional Menus
On the far right of the toolbar are two dropdown menus for additional functionality.
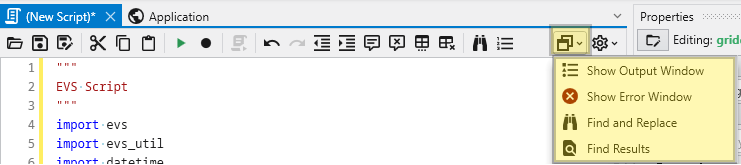
Information Menu
This menu provides access to related information and output windows.
Option
Description
Show Output Window
Opens the Output window, where script print() statements and execution status are displayed.
Show Error Window
Opens a window that displays any errors encountered during script execution.
Find and Replace
Opens the search and replace dialog.
Find Results
Shows the results from a find operation.
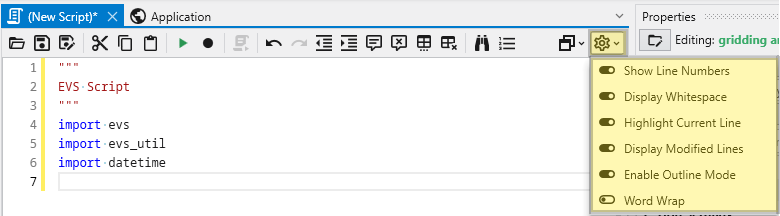
Editor Options Menu
This menu (gear icon) controls the visual display of the text editor itself.
Option
Description
Show Line Numbers
Toggles the visibility of the line number column on the left.
Display Whitespace
Toggles the visibility of characters for spaces and tabs.
Highlight Current Line
Toggles a background highlight for the line the cursor is currently on.
Display Modified Lines
Toggles a visual indicator in the margin for lines that have been changed since the last save.
Enable Outline Mode
Toggles a feature that allows you to collapse and expand code blocks (like functions and classes).
Word Wrap
Toggles whether long lines of code wrap to the next line or extend off-screen.
The Python Interactive window provides a real-time environment to execute Python statements and expressions. This tool allows you to test code snippets, perform quick calculations, and inspect data without needing to run a full script.
Window Components
The interface is divided into three primary sections:
Component
Description
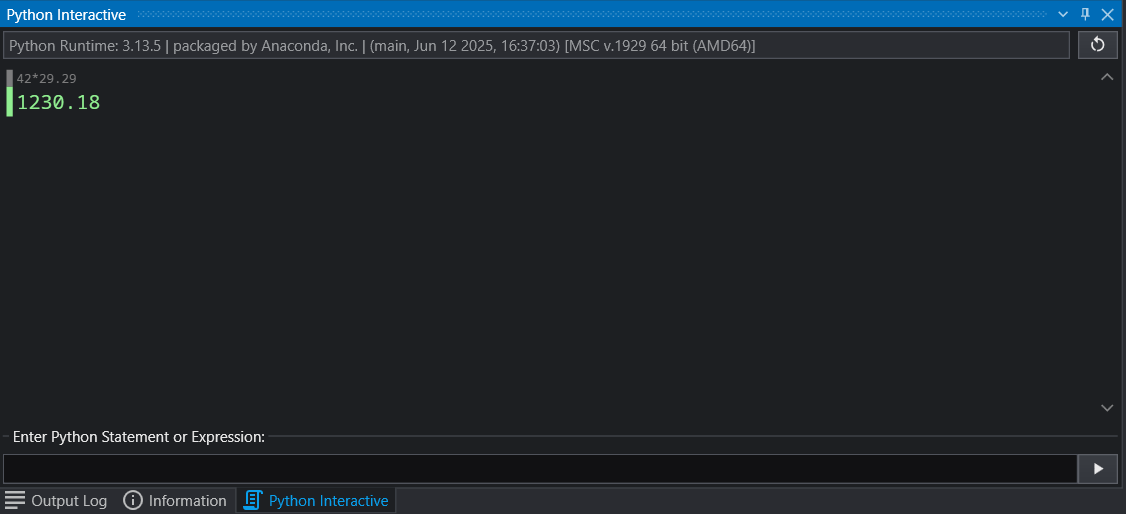
Header Bar
Displays the current Python runtime version used by EVS (e.g., Anaconda). Use the Reset button (circular arrow) on the right to restart the interactive session.
Output Area
Shows a history of your inputs and the resulting outputs. Results are color-coded (e.g., gray for what you typed, green for successful evaluation) for high visibility.
Input Box
The “Enter Python Statement or Expression” field at the bottom where you type your code. Press the Play button or Enter to execute.
To get started with the Python Interactive window, follow these steps:
Enter Code: Click into the input field at the bottom of the window.
Evaluate: Type a mathematical expression (e.g., 42 * 29.29) or a Python command.
Submit: Click the play icon on the right or press your execution hotkey.
Review: Check the Output Area for the result or any potential error messages.
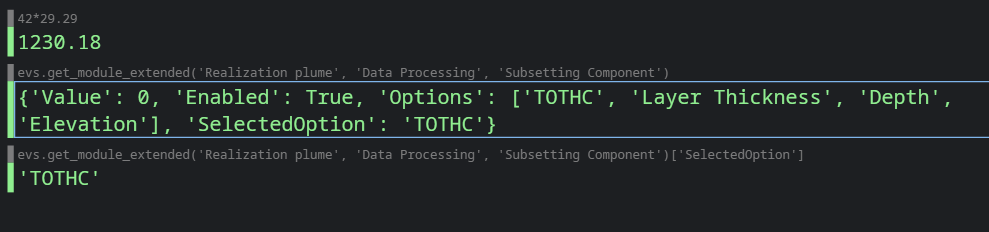
While useful as a general tool (such as using as a calculator, as shown above), the window is typically used for interacting with the EVS API directly.
This is particularly useful when writing scripts, as you can interactively inspect the structure of the EVS API calls, and modify as needed.
For example, you can see the values in a dictionary returned by the API directly:
Clicking on the grey text in the Output Area will re-select it and enter it into the Input Box, which can then be edited. Using the above, this allows us to click on the previous code (evs.get_module_exte….), and then add the entry for SelectedOption to test and make sure we are fetching the results we would expect (the name of the analyte):
This shows us the results of the entered code, which could then be reused in a Python script (such as fetching the current analyte name above for use in a title).
You can programmatically read and set the properties of any module using Python Scripting. This is a powerful feature for automating workflows and creating complex interactions between modules.
The scripting engine provides programmatic access to the same underlying properties that are exposed as controls in the Properties window. This allows scripts to read, evaluate, and update values, mirroring manual user interaction.
The easiest way to script a property is to copy the required syntax directly from the Properties window.
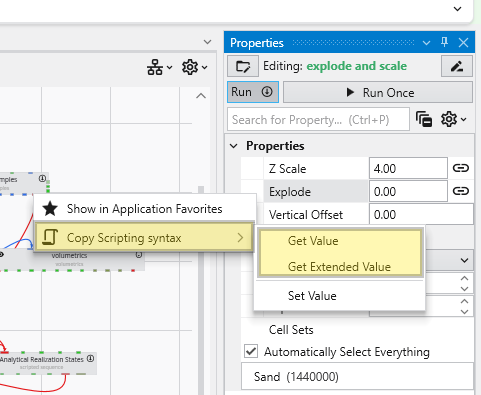
Getting a Property’s Value
To get the current value of a property and assign it to a Python variable:
Open the Properties window for the module you want to control.
Right-click on the property you want to read.
Select Get Value or Get Extended Value from the context menu.
This action copies a line of Python code to your clipboard. You can then paste this code into the Python Script Editor.
Reading Value Example
Right-clicking on the Explode property of the explode and scale module and selecting Get Value will copy the following syntax:
explode = evs.get_module('explode and scale', 'Properties', 'Explode')
After executing this line, the explode variable in your script will hold the current value of the Explode property. Note that the Python API call has three arguments: the module name, the category name, then the property name.
Difference between Get Value and Get Extended Value
The context menu provides two options for getting a value. The Get Value option will use the evs.get_value API call, which fetches the value that is used when saving an application, and contains whatever is required to set the property. This is the value that should be used if using evs.set_value.
The extended option will use evs.get_extended_value, which typically results in a dictionary with the original value, as well as other metadata. For example, a drop down with a list of analytes will typically just return the selected item by index in get_value, but the extended option will include other information, such as the list of options, the selected value by name and index, and more.
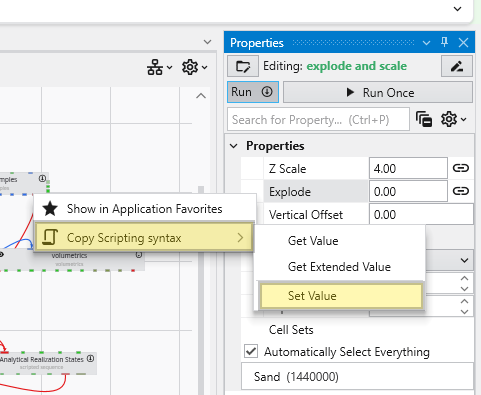
Setting a Property’s Value
To set the value of a property:
In the Properties window, right-click on the property you want to modify.
Select Set Value from the context menu.
This copies the Python syntax for setting the property to your clipboard. Paste the code into the Python Script Editor or the Python Interactive Window and utilize the value as needed.
Updating Value Example
For example, using the same Explode property, the copied syntax would be:
evs.set_module('explode and scale', 'Properties', 'Explode', {'Linked': True, 'Value': 0.0})
You can change 0.0 to any valid value for that property, such as:
evs.set_module('explode and scale', 'Properties', 'Explode', {'Linked': False, 'Value': 1.0})
When dealing with a Linked Property, you should disable the link to manually when setting its value. This is done by setting the corresponding Linked boolean property to false. If you attempt to set the value while it is still linked, your change may be overridden as the value is determined automatically.
Executing this command in the Python Script Editor or the Python Interactive Window will update the property in the module, and the change will be immediately visible in the Properties window.
Python Functions & Operators
Earth Volumetric Studio supports Python 3.12 and 3.13. It will use the highest supported system installed version by default, but can be configured in options.
A listing of Python Functions & Operators can be found at python.org. Below are links to relevant pages:
Please note: C Tech does not provide Python programming or syntax assistance as a part of Technical Support (included with valid subscriptions). Python scripting and functionality is provided as an advanced feature of Earth Volumetric Studio, but is not required to use the basic functionality.
Below are Earth Volumetric Studio specific functions and classes which provide means to get and set parameters, read field data, and act upon the modules in the libraries and network. All functions below are available through the evs module unless otherwise noted.
Module Properties
These functions read and write property values on modules. For a detailed walkthrough with examples, see Accessing Properties Using Python.
evs.get_module(module, category, property)
Gets a property value from a module within the application.
Parameter
Type
Required
Description
module
str
Yes
The name of the module
category
str
Yes
The category of the property
property
str
Yes
The name of the property to read
Returns: The property value.
explode = evs.get_module('explode and scale', 'Properties', 'Explode')
Sets a property value by interpolating between two values. Useful for animating properties across sequence states.
Parameter
Type
Required
Description
module
str
Yes
The name of the module
category
str
Yes
The category of the property
property
str
Yes
The name of the property to set
start_value
any
Yes
The start value for the interpolation
end_value
any
Yes
The end value for the interpolation
percent
float
Yes
The percentage (0.0 to 1.0) along the interpolation from start to end
interpolation_method
InterpolationMethod
No
The interpolation method. Default: InterpolationMethod.Linear
The interpolation_method parameter accepts one of the following evs.InterpolationMethod values:
Value
Description
InterpolationMethod.Step
Step interpolation — value jumps at the threshold
InterpolationMethod.Linear
Linear interpolation (default)
InterpolationMethod.LinearLog
Linear interpolation on a logarithmic scale
InterpolationMethod.Cosine
Cosine interpolation — smooth ease-in/ease-out
InterpolationMethod.CosineLog
Cosine interpolation on a logarithmic scale
# Interpolate the Explode value from 0.0 to 5.0 at 50%evs.set_module_interpolated('explode and scale', 'Properties', 'Explode',
{'Linked': False, 'Value': 0.0},
{'Linked': False, 'Value': 5.0},
0.5, evs.InterpolationMethod.Cosine)
Port Properties
These functions read and write property values on module ports.
evs.get_port(module, port, category, property)
Gets a value from a port on a module within the application.
Sets a port property value by interpolating between two values. Accepts the same evs.InterpolationMethod values as set_module_interpolated.
Parameter
Type
Required
Description
module
str
Yes
The name of the module
port
str
Yes
The name of the port
category
str
Yes
The category of the property
property
str
Yes
The name of the property to set
start_value
any
Yes
The start value for the interpolation
end_value
any
Yes
The end value for the interpolation
percent
float
Yes
The percentage (0.0 to 1.0) along the interpolation from start to end
interpolation_method
InterpolationMethod
No
The interpolation method. Default: InterpolationMethod.Linear
Reading Field Data
These functions and classes allow Python scripts to read the contents of field data from module ports. This is useful for extracting coordinates, node data, and cell data from computed fields.
evs.get_field_info(module, port)
Gets a FieldInfo object for reading field data from a module port. The returned object should be used within a with statement, or you must call close() manually when finished.
Parameter
Type
Required
Description
module
str
Yes
The name of the module
port
str
Yes
The name of the port containing a field to read
Returns:FieldInfo — a field reader for accessing coordinates and data.
Raises:ValueError if the field reader cannot be created for the specified module and port.
with evs.get_field_info('kriging', 'Output Field') as field:
print(f"Nodes: {field.number_coordinates}, Cells: {field.number_cells}")
print(f"Units: {field.coordinate_units}")
# Read coordinatesfor x, y, z in field.coordinates:
print(f" ({x}, {y}, {z})")
# Read node datafor i in range(field.number_node_data):
data = field.get_node_data(i)
print(f" {data.name} ({data.units}): {len(data.values)} values")
evs.FieldInfo
Represents a field, providing access to its coordinates, node data, and cell data. Should be used within a with statement to ensure resources are properly released.
Properties:
Property
Type
Description
number_coordinates
int
The number of coordinate nodes in the field
number_cells
int
The number of cells in the field
number_node_data
int
The number of node data components
number_cell_data
int
The number of cell data components
coordinate_units
str
The units used for coordinates
coordinates
list of (x, y, z) tuples
The node coordinate tuples, loaded lazily
cell_centers
list of (x, y, z) tuples
The cell center coordinate tuples, loaded lazily
Methods:
Method
Returns
Description
get_node_data(index)
FieldData
Gets the node data component at the specified index. Raises ValueError if the index is out of range.
get_cell_data(index)
FieldData
Gets the cell data component at the specified index. Raises ValueError if the index is out of range.
close()
None
Disposes the underlying field reader. Required if not using a with statement.
evs.FieldData
Represents one node or cell data component of a field. Returned by FieldInfo.get_node_data() and FieldInfo.get_cell_data().
Properties:
Property
Type
Description
name
str
The name of the data component
units
str
The units associated with the data
is_log
bool
True if the data component uses log processing
values
list of float or tuples
The data values. Log-processed values are exponentiated. Vector data will be a list of tuples.
Application and Module Management
evs.get_application_info()
Gets basic information about the current application.
Returns: dict — a dictionary with the following keys:
Key
Description
Author
The application author
Organization
The organization
Filename
The application filename
ExecutingScript
The currently executing script
evs.get_modules()
Gets a list of all module names in the application.
Returns: list of str — module names.
for name in evs.get_modules():
    print(f"{name}: {evs.get_module_type(name)}")
evs.get_module_type(module)
Gets the type of a module given its name.
Parameter
Type
Required
Description
module
str
Yes
The name of the module
Returns: str — the module type.
evs.get_module_position(module)
Gets the position of a module in the network editor.
Parameter
Type
Required
Description
module
str
Yes
The name of the module
Returns: tuple of (x, y) — the module’s position coordinates.
evs.rename_module(module, suggested_name)
Renames a module and returns the actual new name. The actual name may differ from the suggested name if a module with that name already exists.
Parameter
Type
Required
Description
module
str
Yes
The current name of the module
suggested_name
str
Yes
The desired new name
Returns: str — the actual new name of the module.
evs.delete_module(module)
Deletes a module from the application.
Parameter
Type
Required
Description
module
str
Yes
The name of the module to delete
Returns: bool — True if successful.
evs.instance_module(module, suggested_name, x, y)
Creates a new instance of a module in the application at the specified position.
Parameter
Type
Required
Description
module
str
Yes
The module type to instance
suggested_name
str
Yes
The suggested name for the new module
x
int
Yes
The x coordinate in the network editor
y
int
Yes
The y coordinate in the network editor
Returns: str — the actual name of the instanced module.
name = evs.instance_module('Estimation.kriging', 'my kriging', 100, 200)
print(f"Created module: {name}")
Disconnects two previously connected module ports.
Parameter
Type
Required
Description
starting_module
str
Yes
The source module
starting_port
str
Yes
The port on the source module
ending_module
str
Yes
The destination module
ending_port
str
Yes
The port on the destination module
Returns: bool — True if successful.
Execution Control
evs.check_cancel()
Checks whether the user has requested to cancel the script. If a cancellation has been requested, the script will stop at that point. Insert this in loops that may run for a long time so that canceling the script remains possible.
for i in range(10000):
    evs.check_cancel()
    # ... do work ...
evs.suspend()
Suspends the execution of the application until resume() is called. Use this when making multiple property changes to prevent the application from updating between each change.
evs.resume()
Resumes the execution of the application, causing any operations that were suspended to run.
Refreshes the viewer and processes all mouse and keyboard actions in the application.
Use With Caution
This is a potentially unsafe operation under certain circumstances that are hard to predict.
At each occurrence of this function, your script will catch up to behave more like manual actions. In most cases this is the only way to see the consequences of commands reflected in the viewer during script execution.
If your script is malfunctioning with this command, try removing or commenting out all occurrences. This command is not recommended within Python scripts executed by the trigger script module.
evs.is_module_executed()
Returns whether the script is being executed by a module (such as trigger script) as opposed to being run directly by the user.
Returns: bool — True if executed by a module, False when the user executes directly (e.g., hitting play in the script window).
Number Formatting
evs.sigfig(number, digits)
Rounds a number to a specified number of significant figures.
Formats a number as a string, adapting the precision to the magnitude of a second number. This is useful when formatting a value relative to a step size or range. Also available as evs.format_number_adaptive().
Parameter
Type
Required
Description
number
float
Yes
The number to format
adapt_size
float
Yes
The reference value to adapt precision to
digits
int
No
The number of significant digits. Default: 6
include_thousands_separators
bool
No
Whether to include thousands separators. Default: True
preserve_trailing_zeros
bool
No
Whether to preserve trailing zeros. Default: False
Returns: str — the formatted number.
Export Scripting
The export scripting API allows Python scripts to respond to events during a web scene export. When the export web scene module writes a CTWS file, it triggers the attached Python script at each stage of the process. Use get_export_stage() to determine the current stage and respond accordingly.
evs.get_export_stage()
Gets the current export stage and related information.
Returns:ExportStage — an object describing the current stage of the export process.
stage = evs.get_export_stage()
# Run initialization code at the start of an exportstage.handle_init(lambda: print("Export starting"))
# Handle a specific module being exportedstage.handle_module('kriging', lambda: print("Kriging exported"))
# Handle sequence states with state number and namestage.handle_sequence('scripted sequence', lambda num, name: print(f"State {num}: {name}"))
# Run finalization code at the end of an exportstage.handle_finalize(lambda: print("Export complete"))
evs.ExportStage
Represents the current export stage and provides handler methods for responding to specific stages. Constructed by get_export_stage().
Properties:
Property
Type
Description
stage
ExportStage.Stages
The current stage of the export process
module
str
The module being exported (empty string if not applicable)
state_number
int
The current sequence state number (-1 if not applicable)
state_name
str
The current sequence state name (empty string if not applicable)
Stages:
Stage
Description
Stages.NOT_EXPORTING
EVS is not currently exporting
Stages.START_EXPORT
The export process just started
Stages.START_MODULE
The specified module is starting the export process
Stages.END_SEQUENCE_STATE
A sequence state of the specified module was just exported
Stages.END_MODULE
The specified module was just exported
Stages.END_EXPORT
The export process just finished
Handler Methods:
Method
Parameters
Description
handle_init(func)
func — a function taking no arguments
Runs func if currently in the START_EXPORT stage
handle_finalize(func)
func — a function taking no arguments
Runs func if currently in the END_EXPORT stage
handle_module(module, func)
module — module name, func — a function taking no arguments
Runs func if the specified module was just exported
handle_sequence(module, func)
module — module name, func — a function taking (state_number, state_name)
Runs func if a sequence state of the specified module was just exported
Python Assets
evs.import_asset(name)
Imports a Python module included in the Python Assets section of the Application Properties. This is used instead of a standard import statement when working with EVS presentation files or packaged data, since Python assets are embedded within the application rather than stored as separate files on disk.
Parameter
Type
Required
Description
name
str
Yes
The name of the Python asset to import
Returns: module — the imported Python module.
Raises:ModuleNotFoundError if no Python asset exists with the given name.
The evs_util module provides functions for converting between three date representations used in EVS:
Format
Example
Description
EVS date string
"2024-06-15T14:30:00"
ISO 8601 format used by EVS module properties
Python datetime
datetime.datetime(2024, 6, 15, 14, 30)
Standard Python datetime.datetime object
Excel date number
45458.604
Days since 1899-12-30, used in Excel spreadsheets
Each function converts from one format to another. The naming convention is {source}_to_{target}:
Function
Converts From
Converts To
evs_util.evsdate_to_datetime(d)
EVS date string
Python datetime
evs_util.datetime_to_evsdate(d)
Python datetime
EVS date string
evs_util.datetime_to_excel(d)
Python datetime
Excel date number
evs_util.evsdate_to_excel(d)
EVS date string
Excel date number
evs_util.excel_to_datetime(d)
Excel date number
Python datetime
evs_util.excel_to_evsdate(d)
Excel date number
EVS date string
import evs_util
import datetime
# Convert an EVS date string to a Python datetimedt = evs_util.evsdate_to_datetime("2024-06-15T14:30:00")
# Convert to an Excel date numberexcel_num = evs_util.datetime_to_excel(dt)
# Convert back to an EVS date stringevs_date = evs_util.excel_to_evsdate(excel_num)
Testing
evs.test(assertion, error_on_fail)
Asserts that a condition is true. If the assertion is false, the specified error message is printed as an error.
Parameter
Type
Required
Description
assertion
bool
Yes
The condition to test
error_on_fail
str
Yes
The error message to display if the assertion is false
value = evs.get_module('kriging', 'Properties', 'Allow Run')
evs.test(value ==True, "Expected Allow Run to be enabled")