Animation
The Animation section of the Home tab has only three functions:
- New 4D/WRL: Creates a new 4DIM or WRL (3D PDF) Animation
- New Video: Creates a new bitmap animation
- Open: opens an existing animation file. btw: animations are saves as .evsani files.
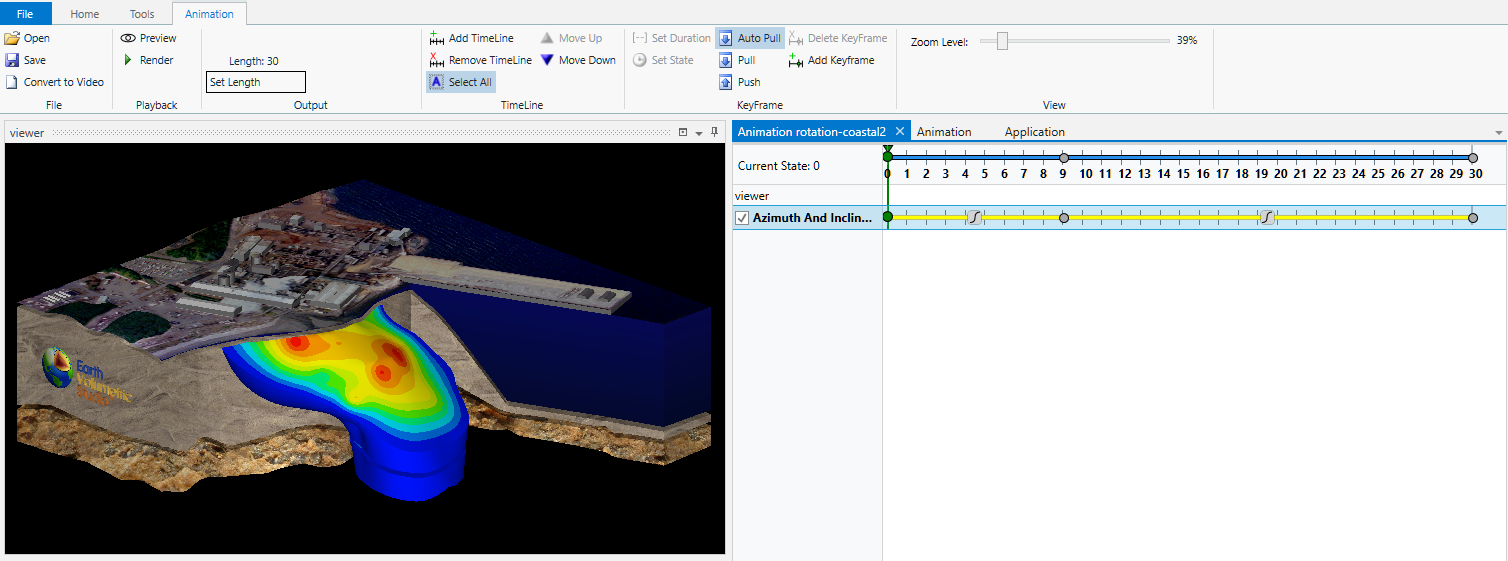
When a new Animation is created or an existing Animation is opened, the Animation tab is exposed:

FILE: The File section has three functions: Open and save .evsani files and the option to Convert 4DIM/PDF animation files to Video files.
PLAYBACK: There are two options here. Preview allows you to play your animation without writing any output. Render creates the final target output.
OUTPUT: Allows you to set (change) the length (duration) of the animation. There are two options when changing duration: Truncate or Scale Key Frames.
TIMELINE: There are 5 functions in the Timeline section: Timelines are the variables that are being animated. They can be as complex as the view in the viewer (Azimuth, Inclination, Scale, Roll), as simple as the visibility of a single object in your application, or a numeric value like a plume level or the position of a slice plane that can vary linearly or with a cosine variation which provides a slow start and stop.
- Add Timeline: Button: Allows you to specify any parameter in your application.
- Remove Timeline: Button: Allows you to any existing (selected) timeline.
- Select All: Toggle: Select all timelines, so that they will all be affected by Keyframe actions.
- Move Up: Button: Allows rearranging timelines.
- Move Down: Button: Allows rearranging timelines.
The Add Timeline Windows are shown below. The top image is where you select the module and below that are the functions/parameters in that module.


For this application we've selected int_shell_plume which is an intersection_shell module. By selecting "Subset List" we actually have the potential to animate a list of parameters in a single timeline.
In the Animation Properties window we can see all of the timeline parameters, and the Subset List has two items: distance to 2d area and VOC levels.

KEYFRAME: There are 7 functions in the Keyframe section: Keyframes are the time markers that establish when actions occur along timelines.
When trying to understand concepts like Pull and Push, remember that everything is relative to the Animator. Push transfers parameters in the Animator UP TO the Application.
- Set Duration: Button: This button is only active when a keyframe (circle) is selected. It allows you to insert or delete states (or time) in the middle of an animation. You can change the duration of the portion of the timeline that corresponds to the timeline up to the selected keyframe.
- Set State / Set Time: Button: This button is only active when a keyframe (circle) is selected. It allows you to set the states (time) in the middle of an animation. You can change the duration of the portion of the timeline that corresponds to the timeline up to the selected keyframe.
- Auto Pull: Toggle: When on, as new Keyframes are added, the values are automatically pulled from the application.
- Pull: Button: When this button is pushed, and a Keyframe is selected, all active timelines will pull values from the application, thus changing the values at that keyframe.
- Push: Button: When this button is pushed, and a Keyframe is selected, all active timelines will push their values into the application, thus changing the values in their corresponding modules (or the viewer) at that keyframe.
- Delete KeyFrame: Button:
- Add KeyFrame: Button:
VIEW: The Zoom Level changes how much of the timeline you can see.