For clients or stakeholders who received an EVS presentation file. Install EVS and select “Presentation” — no license or additional configuration needed.
Each user should install the latest versions available from the download site:
Earth Volumetric Studio
Earth Volumetric Studio Sample Projects
Warning
You need Administrator rights to install EVS.
Run each executable and follow the instructions to set your preferred install folder and options.
After installing EVS, you must set up your license type using the C Tech License Manager. This tool also has many other features discussed in this topic.
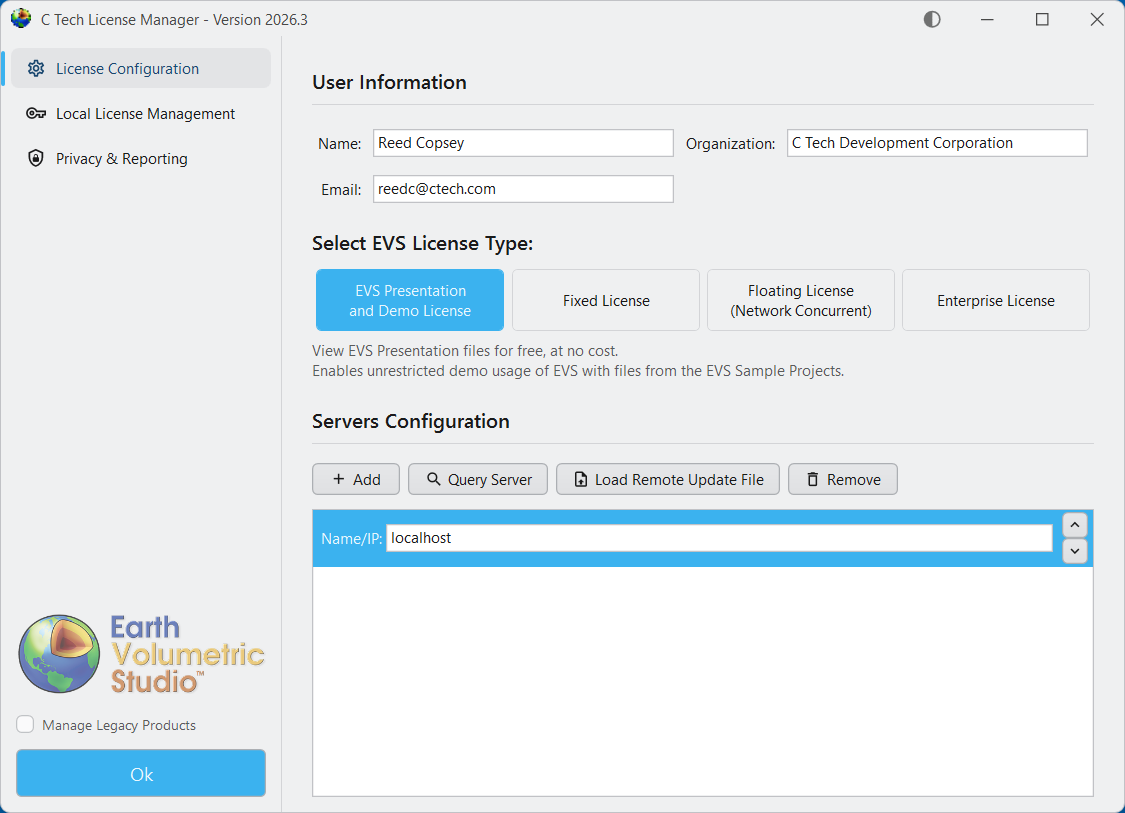
Below are the correct options for a Presentation and Demo License. Enter your name and company name correctly — this information helps C Tech support you if you have problems.
Before you close the C Tech License Manager, click the “Privacy & Reporting” tab on the left side to choose how crash data is sent to C Tech.
Tip
We recommend choosing “Anonymous Reporting” so C Tech can receive crash reports that help us find and fix software problems. These reports do not contain personal information and cannot be linked to your account.
When you click “Ok” to close the C Tech License Manager, it will not open again until you start it manually. Your settings will apply each time you run Earth Volumetric Studio.
Each user should install the latest versions available from the download site:
Earth Volumetric Studio
Earth Volumetric Studio Sample Projects
Warning
You need Administrator rights to install EVS.
Run each executable and follow the instructions to set your preferred install folder and options.
After installing EVS, you must set up your license type using the C Tech License Manager. This tool also has many other features discussed in this topic.
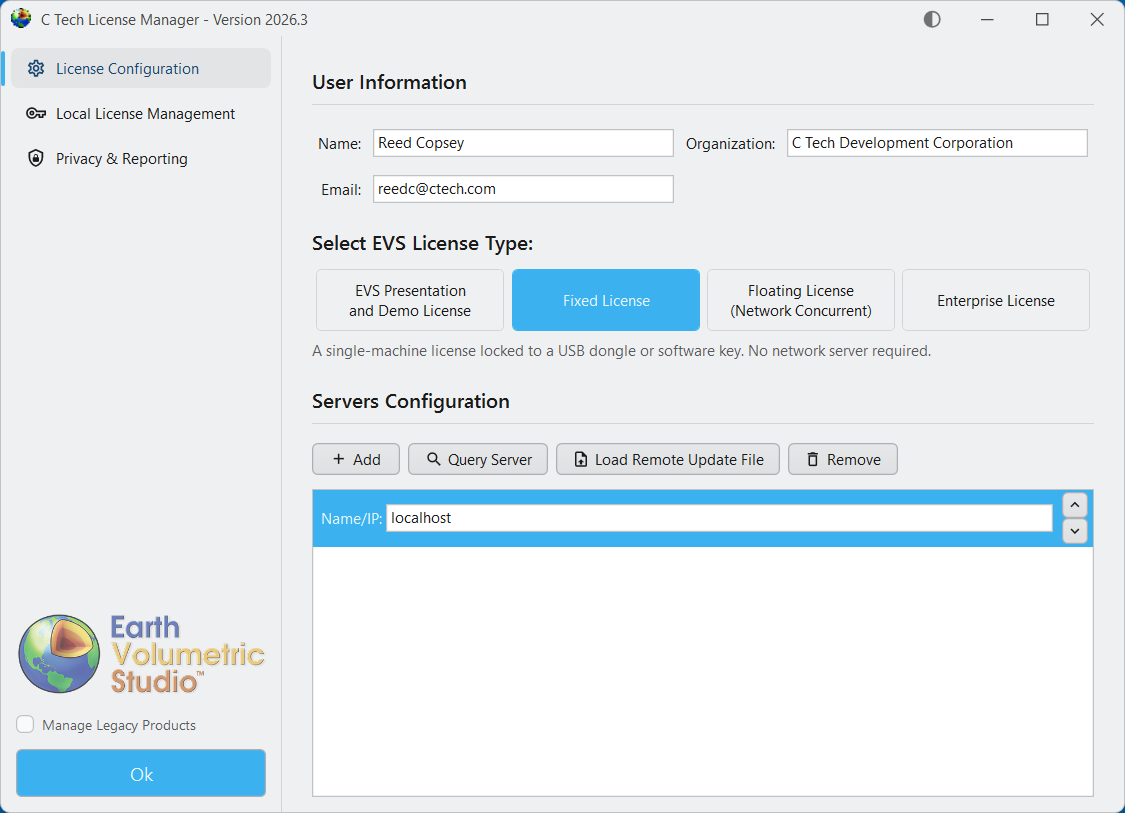
Below are the correct options for a Fixed (USB Dongle) License. Enter your name and company name correctly — this information helps C Tech support you if you have problems.
Before you close the C Tech License Manager, click the “Privacy & Reporting” tab on the left side to choose how crash data is sent to C Tech.
Tip
We recommend choosing “Anonymous Reporting” so C Tech can receive crash reports that help us find and fix software problems. These reports do not contain personal information and cannot be linked to your account.
When you click “Ok” to close the C Tech License Manager, it will not open again until you start it manually. Your settings will apply each time you run Earth Volumetric Studio.
Run each executable and follow the instructions to set your preferred install folder and options.
After installing EVS, you must set up your license type using the C Tech License Manager. This tool also has many other features discussed in this topic.
Below are the correct options for each license type.
Info
Enter your name, email, and company name. If you are setting this up on a server, enter the IT administrator’s information instead.
Server Configuration
For both Floating and Enterprise licenses, you must add one or more license servers in the “Servers” section of the License Configuration tab. Enter the name or address of each computer running the C Tech Universal License Server.
Tip
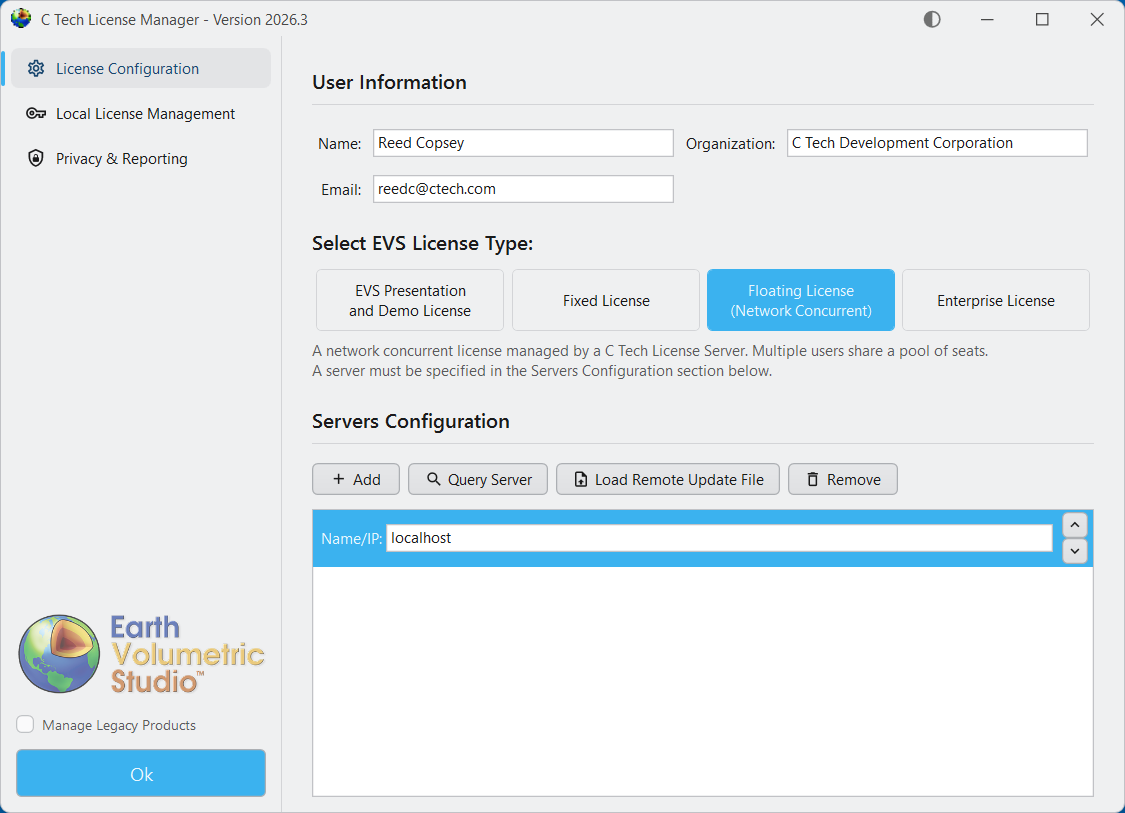
The example images below show “localhost” as the server address. This only works if EVS and the License Server are on the same computer. In most cases, replace “localhost” with the name or address of your organization’s license server.
For Floating Licenses
For Enterprise Licenses
Before you close the C Tech License Manager, click the “Privacy & Reporting” tab on the left side to choose how crash data is sent to C Tech.
Tip
We recommend choosing “Anonymous Reporting” so C Tech can receive crash reports that help us find and fix software problems. These reports do not contain personal information and cannot be linked to your account.
When you click “Ok” to close the C Tech License Manager, it will not open again until you start it manually. Your settings will apply each time you run Earth Volumetric Studio.
C Tech employs a single license server which supports the following products:
Earth Volumetric Studio (EVS) Enterprise Licenses
Earth Volumetric Studio Floating Licenses
EnterVol for ArcGIS Concurrent and Enterprise Licenses (legacy product)
Info
EVS Fixed licenses do not require installation of the C Tech Universal License Server.
The C Tech Universal License Server installer also includes the C Tech License Manager. The EVS installer includes it as well.
Before Proceeding
Warning
The minimum versions supported are Windows 11 x64 and Windows Server 2022 x64.
You need Administrator rights to install.
A system reboot may be required to complete the installation.
You must make sure the network ports used by the license server are not blocked.
Earth Volumetric Studio 2020 and newer versions use port 9348
Older Earth Volumetric Studio and MVS releases use port 9346
These ports are not user configurable; they are hard coded.
If you used C Tech software before 2020, you must uninstall your old license servers first. The new installer will not continue if any old servers are still installed. See Required Uninstalls of C Tech’s Legacy Servers for details.
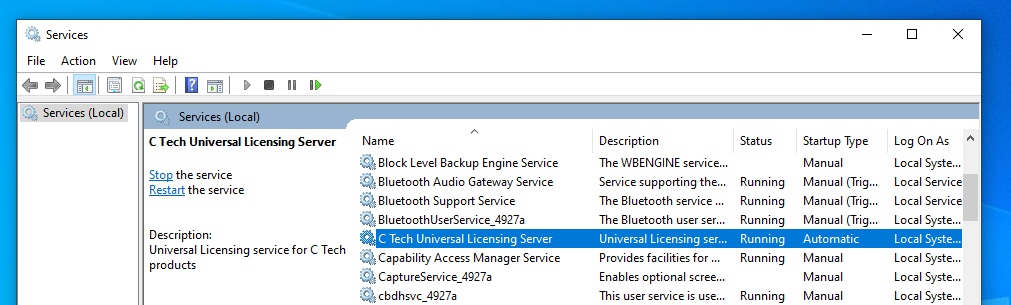
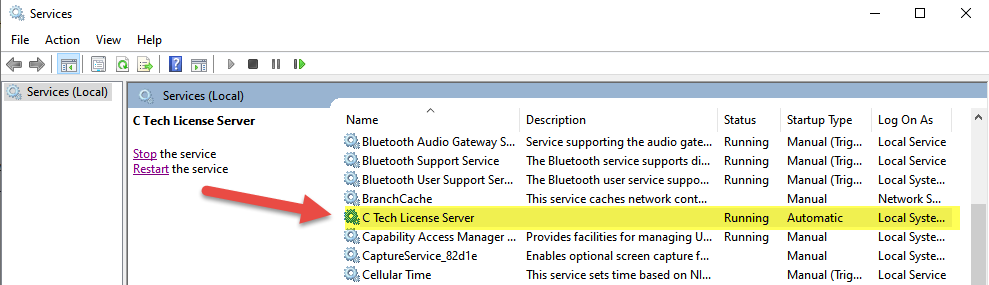
Once you have completed these steps, run the installer. After it finishes, you can verify the C Tech Universal License Server is installed and running by checking the Windows Services program:
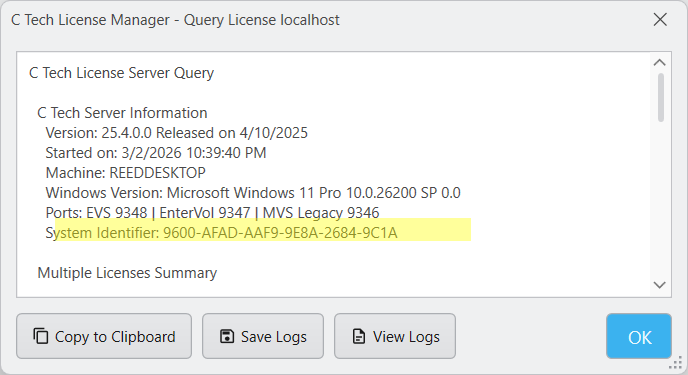
You should also check that the C Tech License Manager can connect to the license server:
For more information on how to check the license server’s status, see License Updates
Cloud Server Installation For Enterprise Customers
Some Enterprise customers run the C Tech Universal License Server on cloud platforms such as Azure and AWS.
USB license keys must still be accessible through a USB port. Some customers have solved this using USB redirection devices (such as AnywhereUSB). Enterprise USB license keys can be used with virtual machines to serve licenses to your users.
Info
Software based licensing is also available for cloud installation. Contact C Tech support for more information.
EVS Enterprise users can use software licenses installed on a C Tech Universal License Server to provide licensing to multiple users. Unlike USB license keys, software licenses are tied to the specific computer where the license server is installed.
To receive your license file after purchase, you will need to provide a “System Identifier” along with some additional information. To find your System Identifier, follow the instructions below based on your setup.
Local Installation
Click the “Local License Management” tab in the C Tech License Manager. At the bottom, you will see the System Identifier section. You can click “Copy to Clipboard” to copy it.
Remote Installation (On a different machine over the network)
In the C Tech License Manager, click the “License Configuration” tab and make sure you have a server properly configured.
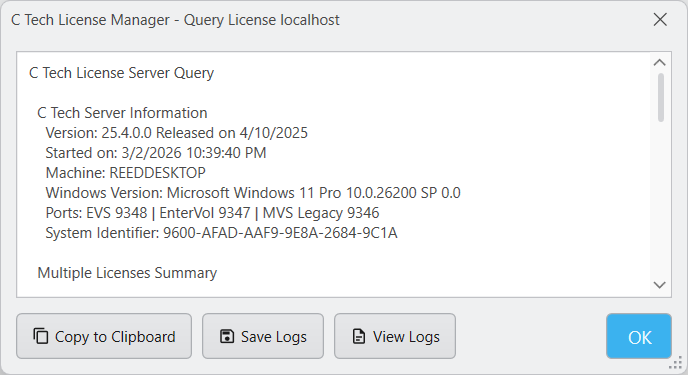
Once you are connected to the server, click the “Query Server” button. The results window will show the System Identifier for the remote server.
Licensing Procedure
Here is how to request an Enterprise License:
EVS Enterprise licenses work through the C Tech Universal License Server like other EVS licenses, but are tied to the server’s hardware instead of a USB license key.
To request your purchased license, do the following:
You can do this on the server or any EVS client computer
If you are using a client computer, you must set up the Servers Configuration first.
Click the “Query Server” button
In the query results window, you will see the “System Identifier”
Click “Copy to Clipboard” to copy the full query results including the System Identifier
Info
Your System Identifier will be unique to your computer.
Then email the System Identifier to sales@ctech.com along with the following information:
System Identifier: (your identifier string)
Company: (your company name)
User: (your name)
E-Mail: (your email address)
Phone: (your phone number)
C Tech’s Invoice number for your order (this is to ensure that you receive the proper licenses)
After verifying your information, C Tech will generate a license file and email it to the address you provided.
Once you receive the .ctupdate file, follow the included instructions to apply the update using the C Tech License Manager.
Info
This only applies to customers who were clients prior to 2020 and are updating old systems.
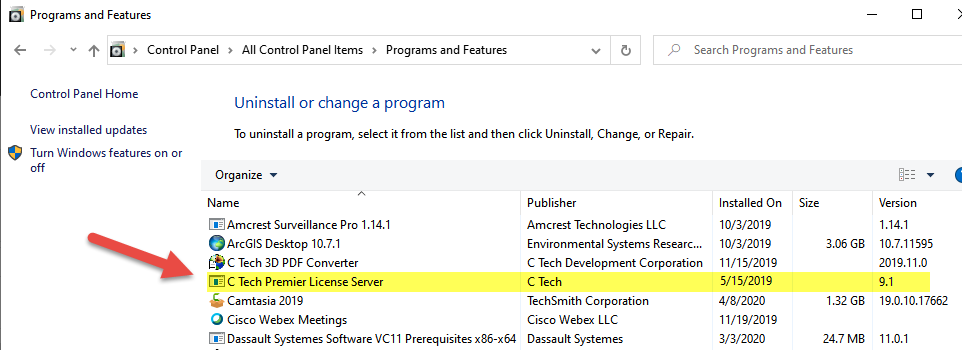
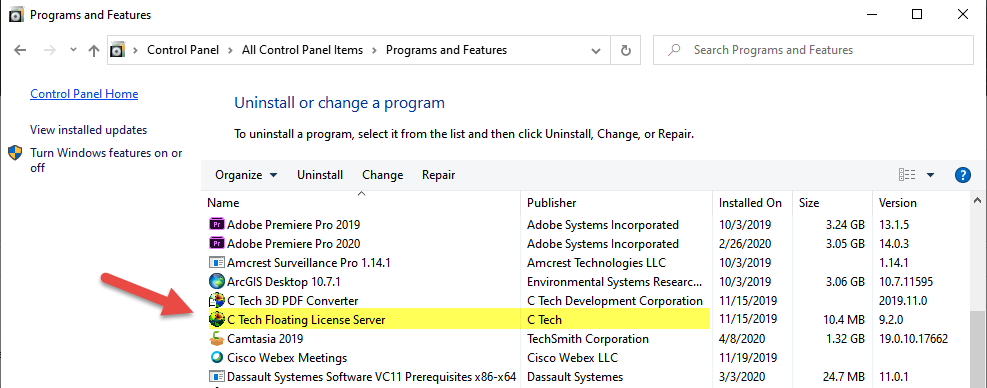
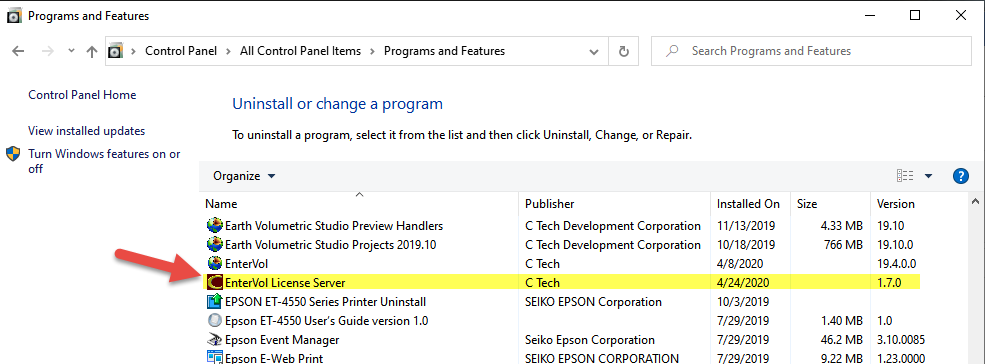
In Control Panel > Programs and Features, there are three legacy C Tech servers which you will need to Uninstall if they exist. These are:
1) C Tech Premier License Server
2) C Tech License Server (EVS / MVS Floating License Server)
3) EnterVol License Server
Warning
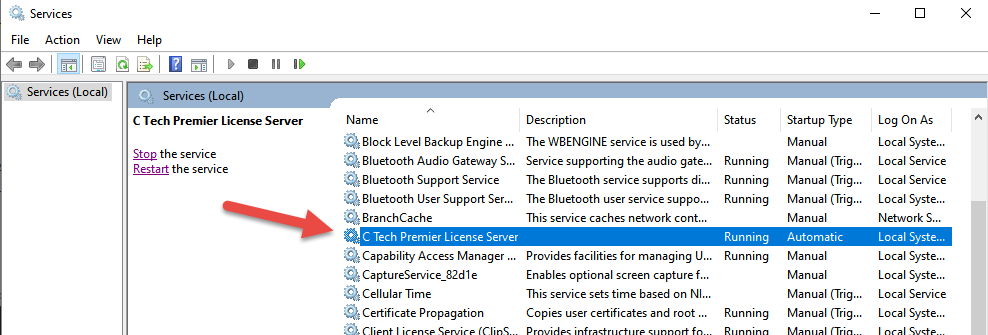
These are Windows Services, so the new C Tech Universal License Server cannot remove them automatically. You must uninstall them yourself. The new installer will stop if any of these three programs are still installed.
C Tech License File Updates let you install and update licenses on both local and remote machines. Updates work for both USB dongle licenses and software-based licenses across all C Tech products.
For USB dongle licenses, the update is written directly to the dongle and only needs to be applied once — even if the dongle is later moved to a different computer. For software-based licenses, updates are tied to the specific computer whose System Identifier was provided when the license was created. You can only apply them on that computer.
C Tech will email you a .ctupdate file (or send it another way if needed). You will use this file to apply the update or install a license. Save it somewhere you can easily find it, as you will need it in the following steps.
Warning
If your C Tech License Manager does not match the images on this page, you may be running an old version. Download and install the latest version from https://ctech.com/downloads/.
Local Updates
This is the standard way to update Fixed (USB dongle) licenses. Floating and Enterprise users can also use local updates when applying the update directly on the license server machine. You can also update a remote license server from another computer — see Remote Updates below.
To update your local licenses, click the “Local License Management” tab in the C Tech License Manager, then click the “Load .ctupdate File” button.
A file browser will open asking you to choose the .ctupdate file you received. Select it, and the License Manager will show whether the update succeeded and display the updated licenses in the License Summary area.
Local License Management Tab Functions
Load .ctupdate File — Load and apply a C Tech License Update File (.ctupdate) to update or upgrade existing licenses.
Refresh License Summary — Refreshes the License Summary display to reflect any changes.
License Summary — Shows all licenses on this computer, including both USB dongle and software-based licenses.
Save Dongle Diagnostics — If you are having trouble with a USB dongle, use this to create a diagnostics file. Choose a folder to save it in. If C Tech support asks for this, send all generated files as email attachments.
Remote Updates
Remote updates let you update your organization’s license server from your own computer, without needing to be at the server. This is useful for Floating and Enterprise license users who need to update a remote C Tech Universal License Server.
To apply a remote update, click the “License Configuration” tab in the C Tech License Manager. You should already have a license server set up. If not, see License Manager Reference to add one first. Then click the “Load Remote Update File” button.
A file browser will open asking you to choose the .ctupdate file you received. Select it, and after a moment the License Manager will show whether the update succeeded. To check the server’s status, click the “Query Server” button on the same row.
The C Tech License Manager is the tool you and your IT team use to manage all C Tech product licenses.
The C Tech License Manager comes with most C Tech products to help you set up and manage licenses. You can also download a standalone installer from C Tech Development Corporation: Downloads.
To launch it, search for “C Tech License Manager” in the Windows Start Menu. When you open it, you will see three tabs on the left side of the window.
Choose the license type that matches your purchase. If you select Floating or Enterprise, the Server Configuration section below will become active.
Server Configuration
Info
You can skip this section if you use EVS Demo, Presentation, or Fixed (USB dongle) licenses.
If you use Floating or Enterprise licenses, use the Servers Configuration section to enter the name or address of each computer running the C Tech Universal License Server. You can add multiple servers so that if one goes down, the others keep providing licenses.
Add / Remove — Add or remove a server name or address for your license server(s).
Query Server — Check that you can connect to a license server and view its status. This shows all licenses on the server, along with system information including the System Identifier (needed for software licenses).
Load Remote Update File — Apply a .ctupdate file to a remote license server. See License Updates for more information.
Local License Management Tab
The Local License Management tab lets you check the status of licenses on this computer, view your System Identifier, and apply license update files (.ctupdate).
Load .ctupdate File — Load and apply a C Tech License Update File (.ctupdate) to update or upgrade existing licenses. See License Updates for more information.
Refresh License Summary — Refreshes the License Summary display to reflect any changes.
License Summary — Provides a summary of all licenses installed on the local machine, including both USB dongle and software-based licenses.
System Identifier — Shows this computer’s unique identifier, which you need when requesting software licenses.
Save Dongle Diagnostics — Creates a diagnostics file for all C Tech USB license keys on this computer. If C Tech support asks for this, send all generated files as email attachments.
Privacy & Reporting Tab
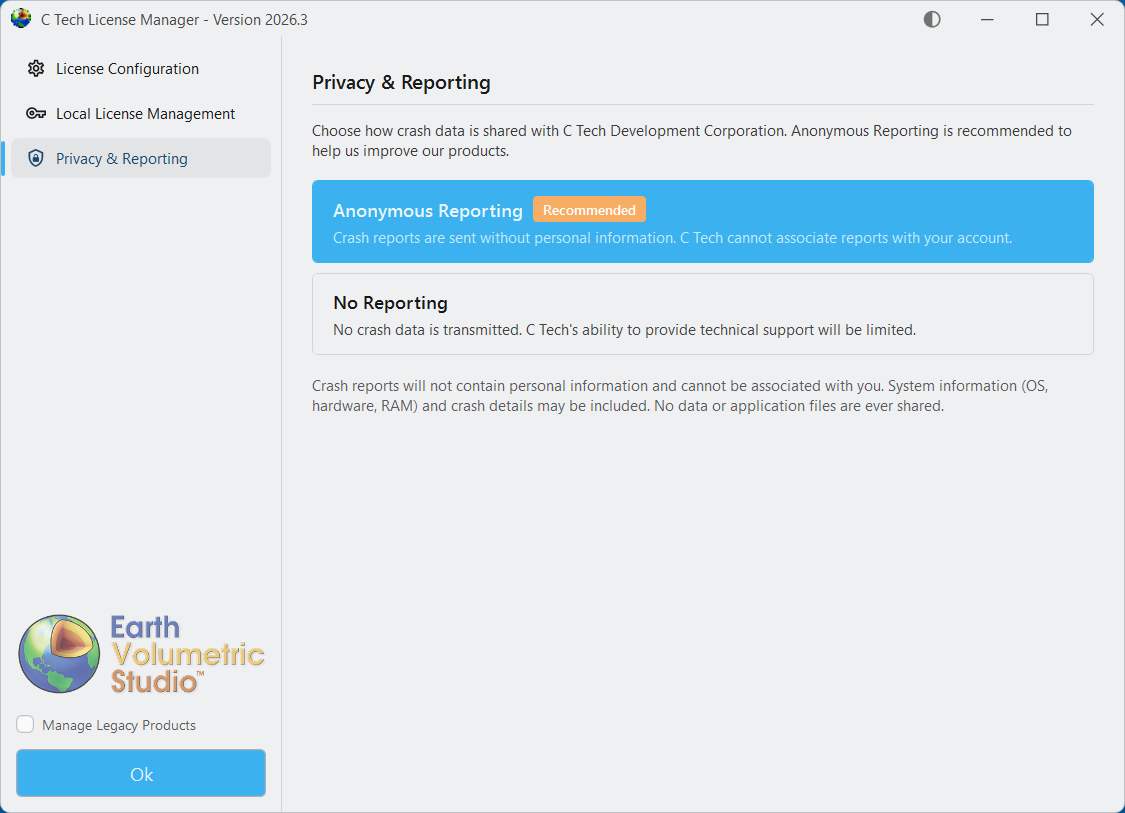
The Privacy & Reporting tab lets you choose whether to send crash reports to C Tech.
Anonymous Reporting — Sends anonymous crash data to C Tech to help improve software quality. Reports do not contain personal information and cannot be associated with your account.
No Reporting — No crash data is shared with C Tech.
Tip
We recommend choosing “Anonymous Reporting” so C Tech can receive crash reports that help us find and fix software problems.
EnterVol for ArcGIS is a legacy product. This section provides installation and licensing documentation for customers who are still using EnterVol.
Info
EnterVol license options are hidden by default in the C Tech License Manager. To reveal them, check the “Manage Legacy Products” checkbox at the bottom of the left sidebar.
For Earth Volumetric Studio (EVS) documentation, please refer to the main sections of this help site.
Installation of the latest version of EnterVol for ArcGIS available from the download site
Hostname or IP Access of the computer running the C Tech Universal License Server
Warning
Installation requires Administrator rights.
Run each executable and follow the instructions to set your preferred install folder and options.
With all license types, the first step of client setup (after software installation) is to set up the proper license type in the C Tech License Manager. The C Tech License Manager has many additional functions discussed in this topic.
Info
EnterVol for ArcGIS license options are hidden by default in the C Tech License Manager. To reveal them, check the “Manage Legacy Products” checkbox at the bottom of the left sidebar.
If your organization has purchased EnterVol concurrent licenses and properly installed and configured the C Tech Universal License Server locally or on your network, you can follow the simple steps below to configure a client installation for a concurrent license.
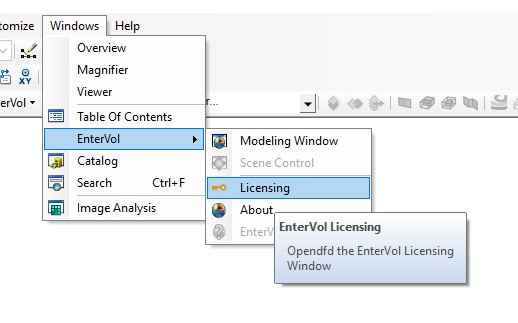
Launch the C Tech License Manager by clicking on the Licensing Option in the EnterVol menu entry under Windows > EnterVol > Licensing
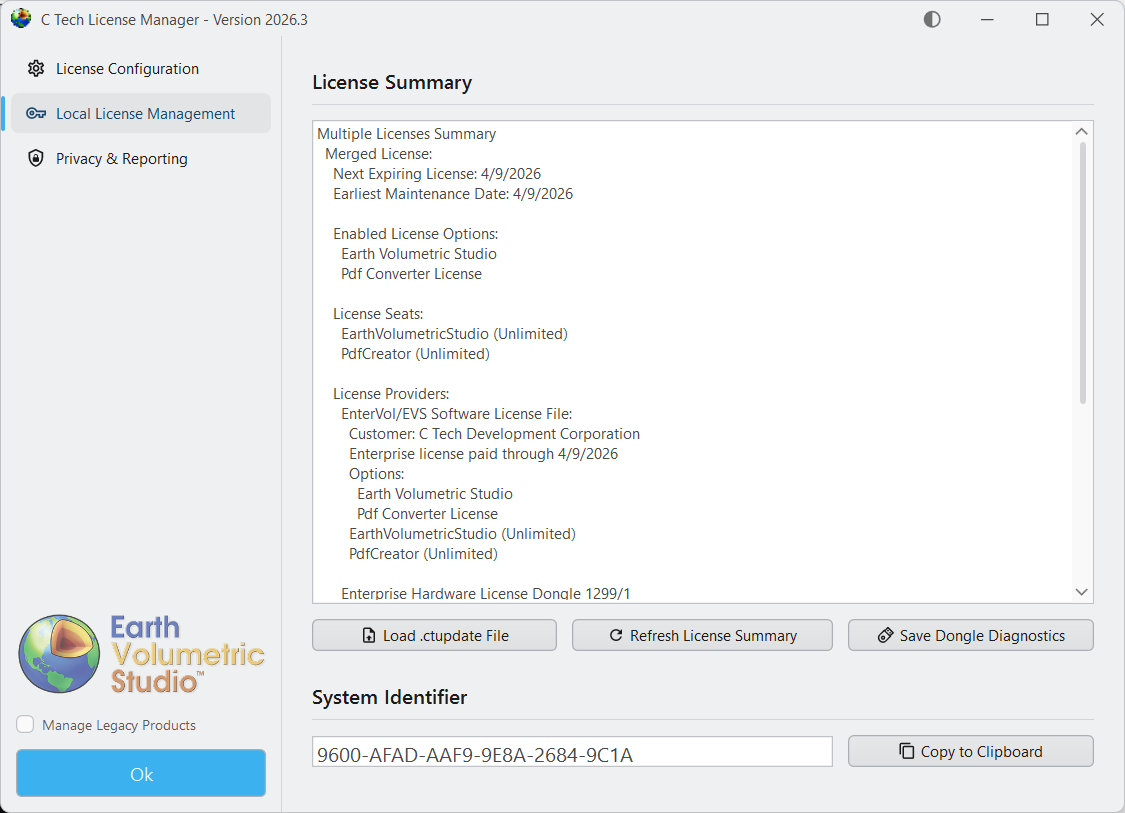
If your client computer can connect to a valid server, your licensing window should show something like the above.
The C Tech License Manager is used to configure licensing for EnterVol for ArcGIS. It comes bundled with the EnterVol installer and can also be downloaded separately from C Tech Development Corporation: Downloads.
Launching the License Manager
You can launch the C Tech License Manager from the Windows Start Menu, or from within EnterVol’s menus in ArcGIS (ArcScene):
Enabling EnterVol License Options
Warning
EnterVol for ArcGIS license options are hidden by default. You must check the “Manage Legacy Products” checkbox at the bottom of the left sidebar to reveal EnterVol license type options.
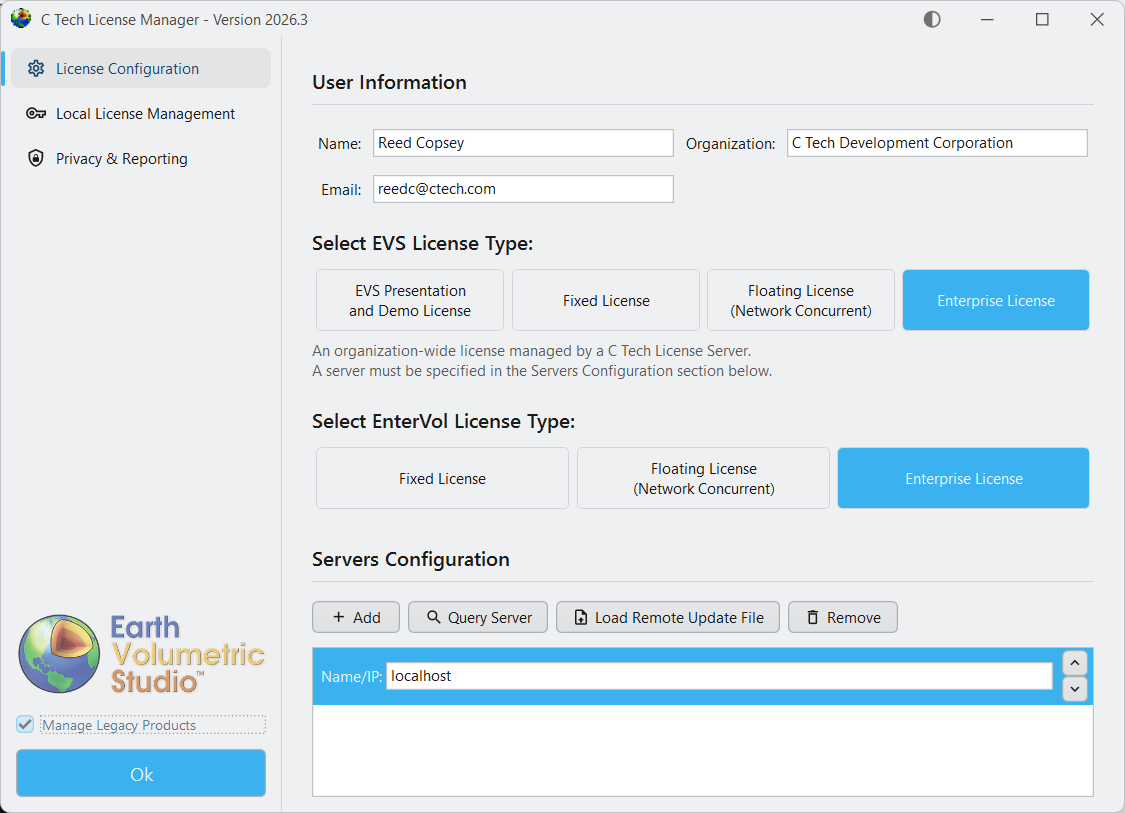
Once “Manage Legacy Products” is enabled, the License Configuration tab will display EnterVol license types alongside EVS options:
Configuring User Information
On the “License Configuration” tab, enter the following:
Name: The user name if on a client computer, or the IT Administrator name if on a server.
Organization: Your company name (e.g., ACME Geology, Inc.)
Select the appropriate EnterVol license type for the product you have purchased:
EnterVol Fixed License — For a single workstation, locked to the machine’s hardware.
EnterVol Floating License — For concurrent use via a network license server with USB dongle.
EnterVol Enterprise License — For concurrent use via a network license server with software-based licensing.
Choosing Floating or Enterprise licenses will activate the Servers Configuration section where you can add the hostname or IP address of your license server.
Configuring License Servers
If you have a remote license server, use the Servers Configuration section to specify the Name/IP for your license server. Multiple servers can be configured for redundancy.
Add / Remove: Add or remove IP number or hostname for your license server(s).
Query Server: Check the status of and confirm communication with the server.
Load Remote Update File: Apply a .ctupdate file to a remote server.
EnterVol for ArcGIS license options are hidden by default. To configure an EnterVol license, check the “Manage Legacy Products” checkbox at the bottom of the left sidebar in the C Tech License Manager.
C Tech License File Updates provide a way to install and update licenses on both local and remote machines. The main functions of C Tech License File Updates include upgrading and/or updating C Tech Software Licenses for EnterVol for ArcGIS.
The Local License Management tab provides several important functions:
Load .ctupdate File: Allows you to apply a C Tech License Update File (.ctupdate) to install a new software license for supporting products or update existing licenses.
Refresh License Summary: Refreshes the License Summary display to reflect any changes.
License Summary: Provides a summary of licenses installed on the local machine, as well as (local) system information such as the System Identifier used by software based (vs dongle) licenses. Also shows information related to the license providers, whether they come from C Tech USB Dongles or from C Tech Software Licensing.
System Identifier: Unique Identifier that is unique to the local system. This is used for C Tech Software Licenses. Please refer to Requesting EnterVol Licenses for more info.
Save Dongle Diagnostics: In cases where the dongle needs troubleshooting, this will prompt you to select a destination folder and will then generate a file containing diagnostics of all installed C Tech USB Dongles. If requested by C Tech support, please include all generated files as attachments for subsequent support emails.
Local Updates
For both license updates and license installations, if they are to be performed on the local workstation, then select the “Local License Management” tab in the C Tech License Manager, and click on the “Load .ctupdate File” button.
Warning
If your C Tech License Manager does not match the images in this topic, you are likely running an old version and need to install the latest version from https://ctech.com/downloads/.
You will be prompted to select the .ctupdate file emailed to you. Select the .ctupdate and the license manager will report the result of the local update and also show the status of the updated licenses in the License Summary area.
Remote Updates
For both license updates and license installations, if they are to be performed on a remote server, then select the “License Configuration” tab in the C Tech License Manager. Ensure that you have configured a server by clicking on the “Add” button and then entering the Name or IP of the server. See EnterVol License Manager > Configuring License Servers for more information. Then you may click on the “Load Remote Update File” button.
You will be prompted to select the .ctupdate from the computer’s file system. Select the .ctupdate file emailed to you. After a brief moment, the license manager will report the result of the remote update. To view the status of the server, you may now click on the “Query Server” button on the same row.
Privacy & Reporting
The “Privacy & Reporting” tab lets you choose how crash data is shared with C Tech Development Corporation. You may choose between “Anonymous Reporting” and “No Reporting”. Please read the provided descriptions for each option for more information.
Tip
It is recommended to select “Anonymous Reporting” since this can provide C Tech with information which may be crucial in debugging possible software errors or crashes. Crash reports will not contain personal information and cannot be associated with your account.
EnterVol for ArcGIS users can use the C Tech Software License installed with a C Tech Universal License Server to provide licensing to its users. Unlike the C Tech USB License Dongle for Earth Volumetric Studio, these software licenses are locked to the machine’s hardware where the license server is installed.
Info
Fixed EnterVol Licenses use a locally installed C Tech Universal License Server and the “System Identifier” we require is on your local computer.
Concurrent and Enterprise Licenses use a remotely installed C Tech Universal License Server and the “System Identifier” we require corresponds to the server.
You will need to provide a “System Identifier” as well as additional information in order to receive a license file for a license that has been purchased and paid for. To obtain the “System Identifier”, please use the following instructions depending on where you have the licensing server configured.
Local Installation
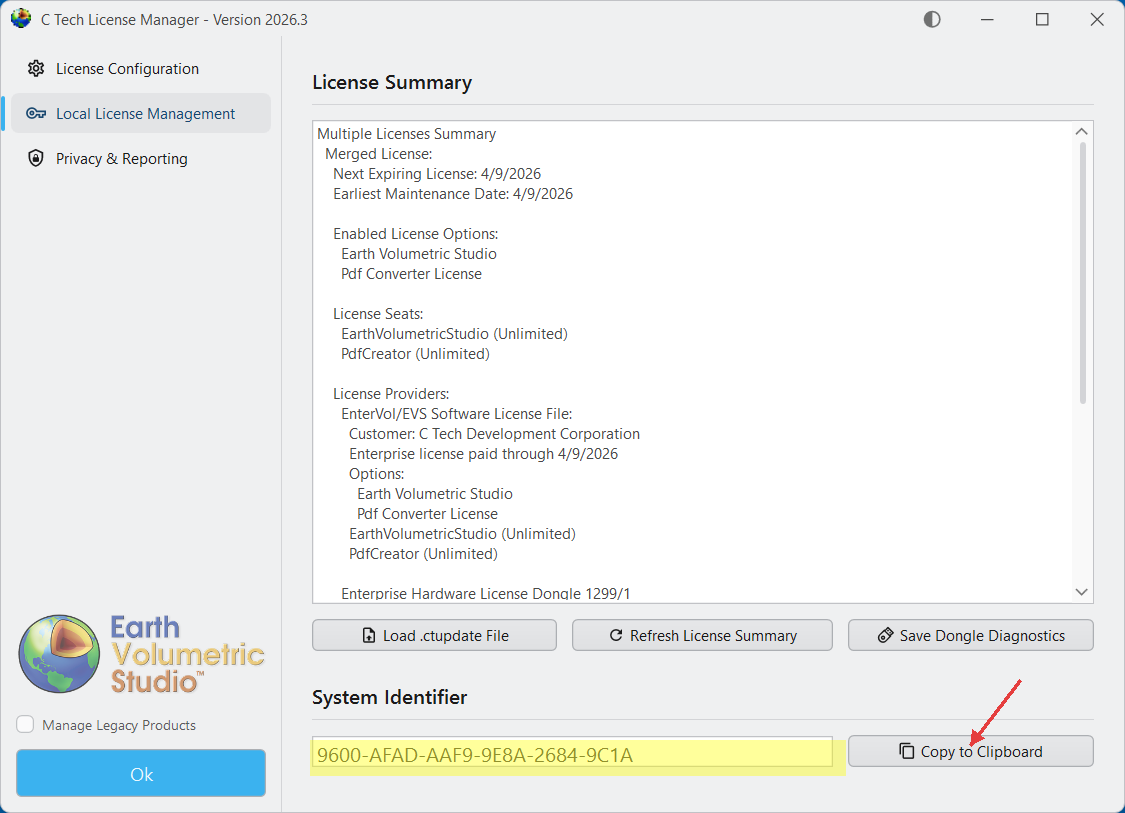
Select the “Local License Management” tab in the C Tech License Manager. There you will see at the bottom the System Identifier section. For your convenience you can click on the “Copy to Clipboard” button.
Remote Installation (On a different machine over the network)
From the “License Configuration” tab in the C Tech License Manager, ensure that a Server is properly configured.
When the connection to the server is successful, you will see the following window when you click the “Query Server” button. The System Identifier for the remote server is displayed in the query results.
Licensing Procedure
For Fixed, Concurrent and Enterprise License Customers, the licensing procedure is below.
EnterVol Client-Server installations use the C Tech Universal License Server just as other licenses do, but the license is locked to the server CPU, not to the USB dongle (key).
To request a license that has been purchased and paid for, you must do the following:
This can be done on the server or any EnterVol Client computer
When this is done on a computer that is not the server, you must complete the Servers Configuration first.
Click the “Query Server” button
In the query results window, you will see the “System Identifier”
Click “Copy to Clipboard” to copy the full query results including the System Identifier
For Fixed EnterVol Licenses, run C Tech License Manager on the computer to be licensed and select the “Local License Management” tab:
Click on “Copy to Clipboard” next to the System Identifier
Info
Your System Identifier will be unique to your computer.
Then send that string to sales@ctech.com along with the required information below:
System Identifier: (your identifier string)
Company: (your company name)
User: (your name)
E-Mail: (your email address)
Phone: (your phone number)
C Tech’s Invoice number for your order (this is to ensure that you receive the proper licenses)
Upon verification of the information you provide, C Tech will generate a license file which will be sent to the e-mail address provided above.
Once you receive the .ctupdate file, you will perform the update using the C Tech License Manager and the instructions which will accompany the file.
The C Tech Universal License Server supports the following EnterVol license types:
EnterVol Enterprise Licenses
EnterVol Floating Licenses
EnterVol Fixed Licenses
Info
EnterVol uses TCP/IP Port 9347. This port must not be blocked by firewalls or other network security software. This port is not user configurable.
Installation
The C Tech Universal License Server installer is the same for both EVS and EnterVol products. Please follow the main C Tech Universal License Server Installation guide for installation instructions.
If you need a software-based license (Enterprise or Fixed), see Requesting EnterVol Licenses to obtain your license file.
Cloud Server Installation
Enterprise customers can install the C Tech Universal License Server on cloud platforms such as Azure and AWS. This requires USB dongles to be accessible via a USB port (e.g., using an AnywhereUSB device). Software-based licensing is also available for cloud installations — contact C Tech support for more information.
Earth Volumetric Studio (EVS) runs on most modern PCs and does not require special hardware.
Minimum Requirements
Hardware Item
Minimum Requirement
Operating System
64-bit Windows 11
RAM
8 GB minimum. 16-64 GB strongly recommended for production work.
Processor
Any modern processor. Eight or more cores recommended.
Monitor
1920 x 1080 minimum. 4K or higher is desirable.
Recommendations
Memory (RAM)
How much memory you need depends on your projects and data. While 8 GB is the minimum, we strongly recommend 16-64 GB or more for any new system. DDR5 memory is much faster than DDR4 and will noticeably speed up EVS calculations.
Biggest Performance Impact: RAM Speed
Of all hardware choices, faster RAM has the greatest impact on how quickly EVS processes data. Many of EVS’s calculations depend heavily on memory speed. Upgrading to DDR5 memory can dramatically reduce processing times — often more than a faster processor alone. If you are buying a new system, prioritize RAM speed and capacity above all else.
Graphics Card
A good graphics card makes 3D rotations and interactions smoother and faster. EVS works with most graphics cards, but very old or low-end cards may not support all visual features.
NVIDIA GeForce cards offer the best performance for the price. We use NVIDIA cards in our own systems and recommend them for most users.
NVIDIA Quadro and other professional cards perform extremely well if budget is not a constraint.
EVS can use your graphics card’s processing power (GPU compute via CUDA) to speed up calculations. This works best on higher-end gaming cards and professional graphics cards.
Processor
EVS runs on any modern processor, and a faster processor means faster results. Eight or more cores are highly recommended, as many EVS tasks run faster with more cores.
Monitor
A good monitor makes it easier to work effectively for extended periods. We strongly recommend at least 1920 x 1080 resolution. 4K or higher is desirable and provides significantly more workspace for complex models.
Operating System & IT Requirements
EVS is compatible with 64-bit Windows 11. The C Tech Universal License Server is additionally supported on Windows Server 2022 and Windows Server 2025.
Open ports 9346, 9347, and 9348 for network traffic (required for Floating or Enterprise Licenses)
Anti-Virus & Anti-Malware
Exclude the following from virus scans: C Tech file types (.evs, .evsp, .4dm, .ctupdate) and all C Tech installation folders and EVS project folders
Info
Customers with active subscriptions can contact support to review a system configuration prior to purchase or to get specific hardware recommendations tailored to their projects and data.
Here are common problems you may run into when installing, setting up, or updating C Tech licenses. If your issue is not listed here, contact C Tech support at support@ctech.com.
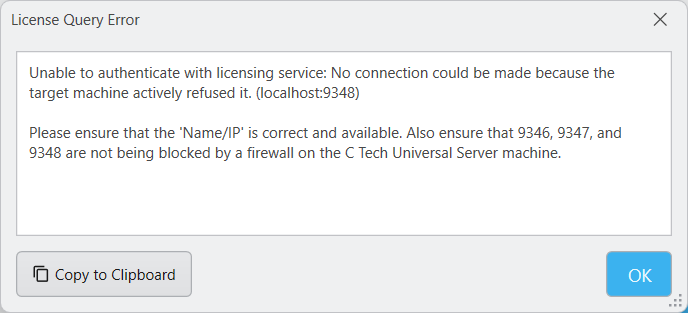
Unable to authenticate with licensing service
First, check that the server address you entered in Server Configuration is correct and reachable on your network. If that looks right, the most likely problem is that your network is blocking the ports the license server uses.
Warning
Make sure ports 9346, 9347, and 9348 are open on the computer running the C Tech Universal License Server. These ports allow the license server to communicate with client computers.
License update file is corrupted
Go back to the original email from C Tech and check that the file has not changed. Virus and malware protection software can sometimes damage email attachments. Tell your security software to ignore .ctupdate files so it does not modify them.
If the issue persists, contact C Tech support for an alternative delivery method.
USB license key not included in the update
The update file may not cover all USB license keys in your organization. Check the invoice from C Tech for a list of supported keys. If your key is not listed, it was not included in this update.
USB dongle update fails via Remote Desktop
When you connect to a computer using Remote Desktop, you may not be able to access USB license keys. Remote Desktop does not always allow direct access to USB hardware.
To work around this, open the C Tech License Manager and use Server Configuration to connect to “localhost” (which points to the same computer you are on). Then apply the update remotely. See License Updates for step-by-step instructions.