With all of the new improvements EVS-Pro and MVS Version 8.5 added for handling images, I felt that it was time to introduce our first official post for the new “Tips and Tricks” section of ctech.com. This section of the website is intended for short discussions about features in the software, and how to make the best use of EVS or MVS within your organization.
C Tech staff will periodically post a new tip to the website, each highlighting some aspect of the software. Unlike the help system, we will be focusing more on why a feature exists in EVS and how to use it, and trying to highlight the tips we find help us be more efficient or more creative in our own work. Sometimes (like today), we’ll talk about a new feature in the software. Often, we may just write a short tip on a way to improve your work flow. Comments and suggestions for new tips in the future are encouraged, and will help determine what topic may be discussed next.
I’d like to kick off our new section with a discussion of aerial photography. EVS-Pro and MVS have always been able to display aerial photography and use it to annotate your model, but recently, some major improvements were made to the software that will really help you get the most out of your imagery in the future. Those of you familiar with the software have probably used the Read_Image and texture_map modules many times. Some of you may be quite comfortable with the issues involved, and have your own sets of workarounds to using these modules.
One of the most exciting improvements in Version 8.5 is the new overlay_aerial module. This module should replace Read_Image and texture_map in your applications in the future. Not only does it handle more formats than the old modules (including handling GeoTiff, ECW, and Mr Sid files), it handles all images in a much cleaner, much simpler manner.
First, let’s briefly look at how things used to be… For this post, I’m going to focus on a small site where I have five buildings and an aerial photo given to me as a GeoTiff file. To use this in 8.2 and earlier, the first thing I needed to do was to get a world file from my GeoTiff. Unfortunately, there wasn’t a tool in EVS to do this for me, so I used a small 3rd party utility that would create a world file (.TFW) from my GeoTiff.
So now, I have my image, world file with the georeferencing, and a buildings file. I put together this simple application:
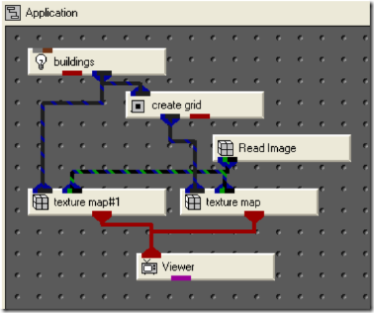
This application uses create_grid to make a flat surface that can be used with texture_map. Eventually, I’d probably use a .geo or .gmf file with Krig_3D_Geology and geologic_surface to create a surface to texture_map, but this is a nice option if you just want to look at the photo without having geologic information.
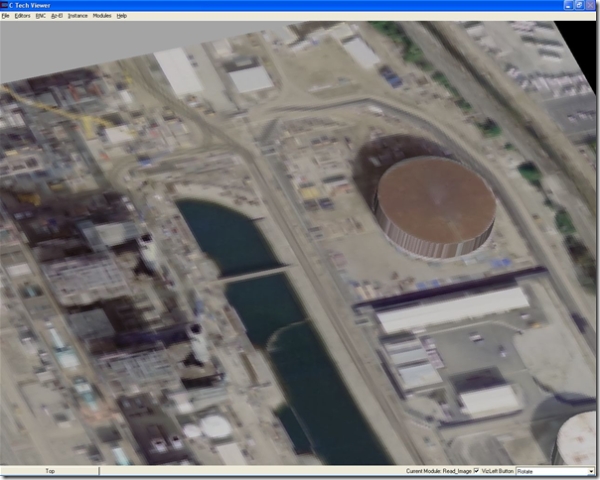
Here’s where things get tricky – When we do this, this is what shows up in the Viewer:
There are a couple of issues here. First, our image doesn’t extend out to the top of the surface, so we get horrible streaking. This can be corrected by adding an image border in Read_Image, and playing with the border size until things look better (in this case, a border size of 50 is required). Even so, you can’t get this just perfect – no matter what you do, the sides of the buildings still streak, and the picture looks a bit grainy. Here is a close-up of this view once it’s been cleaned up:
If you click on the picture above to see it full-resolution, you’ll notice that it still looks very pixelated, and that the buildings still don’t look perfect.
What is causing the pixelation is that the 3D renderers in EVS and MVS need to pass the texture into the graphics card, and can’t put through the entire GeoTiff in its full resolution. Since the original image is quite large (3673×8614 pixels, in this case), it gets downsized in Read_Image by a factor of 5. This means that each pixel used in the texture mapping was originally a 5×5 block of pixels, so we are getting 1/25th of the original pixels used in our final output! 3D models can’t use the image the same way that a paint program can, and this becomes a common issue with texture mapping in true 3D.
If we wanted to improve this in version 8.2, we would have to do some preprocessing work. We would need to take our original image and crop it to the extents of our site, then create a new world file that worked with this cropped version of our image. At that point, we would be a lot better off (since we wouldn’t be using the full 8600 pixels, but rather only about 2500), and it would load in using a downsize of 2 instead of 5. This would make our image look a lot better, since every pixel in the output would only be a 2×2 grid, or 4 original pixels, instead of 25.
The streaking down the sides of the buildings presents a different challenge. To work around that, we would need 2 buildings files and 2 modules – one for the “top” of the buildings (which we could make by having a buildings file with very short buildings that were positioned near the top of the actual buildings), and separate one for the walls and floor of the buildings.
Version 8.5 changes all of this by introducing a new module – overlay_aerial.
The new overlay_aerial module simplifies everything we’ve done at this point. To start with, we can now use the GeoTiff file directly – we don’t need a separate world file. To use this module, I created a new application as follows:
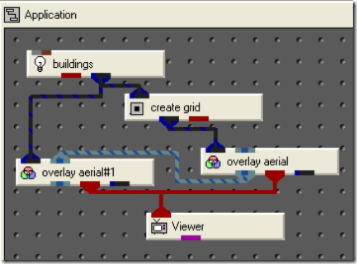
This is similar to our application before, but a little simpler. We no longer need Read_Image, as overlay_aerial reads the file directly. Note that I’m using the filename port (2 colors of blue) to share the same image file between both overlay_aerial modules.
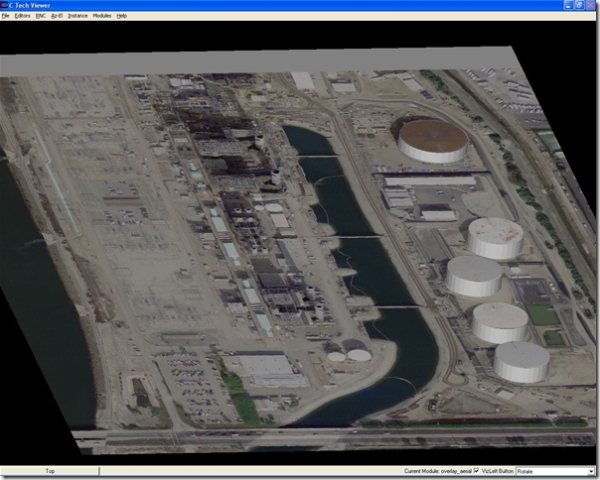
Right away, the difference in pictures is dramatic:
With absolutely no work on our part, we no longer have to worry about streaking, or about the sides of the buildings! Overlay_aerial also automatically goes through, and based off the georeferencing, crops our original image and only reads in the portion it can use. It also automatically resamples the image instead of downsizing it.
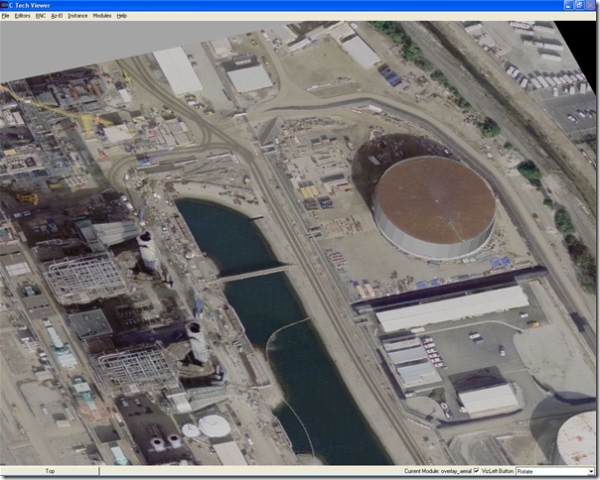
Look at the following close-up carefully:
See the difference between this and the picture above? If you click on the above image, the full size version will display, which shows the dramatic improvement in quality. Also, the sides of the buildings no longer streak – overlay_aerial automatically splits the buildings into separate outputs – the tops get texture mapped with the aerial photo, and the sides are a constant color (which I can change in the module if I decide I don’t like the dafault light gray color). There is even an option to not display the sides at all. They are output as a blue-black field, which can be used with the new texture_walls module to actually add textures to the walls of the buildings.
Here is a close up of the two versions – put together in the same image:
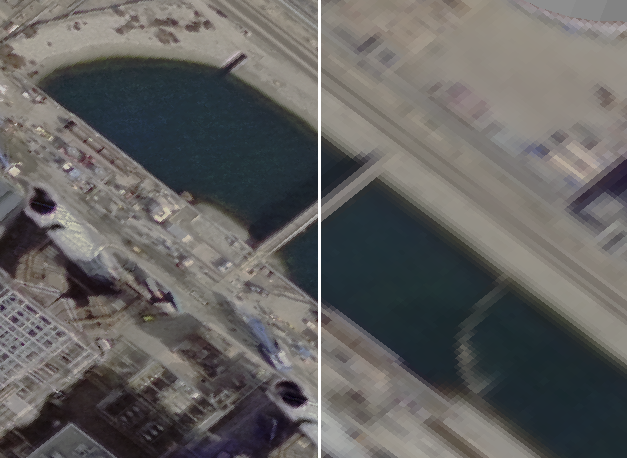
Overlay_aerial is used on the left side of this image, while Read_Image and texture_map are on the right.
The improvements are even more noticeable when you start dealing with very large images. The image I’m using here is large for EVS and MVS – but quite small compared to some we see. We often see people using Mr Sid files with 50000×50000 pixel or higher resolutions! In 8.2, that image was unusable, but even if you converted it to a GeoTiff, it would have been downsized by a factor near 50! That means that each pixel would have been 2500 original pixels, even if the site was only a tiny portion of the original image! Often, with overlay_aerial, the image’s native resolution will be used with no resampling whatsoever.
I hope you enjoy the new module, as well as the new tips section! Please leave comments on your thoughts, and if you’d like to see more discussions like this in the future.
And don’t forget to e-mail in suggestions for future tips!
-Reed Copsey, Jr.


